Inbox
Inbox overview
Inbox is the screen which you see when you log in after setting up your account. This is the screen where you see all the incoming messages. Here, you can –
- Start a new customer conversation
- Quickly respond to the customer messages
- Archive the messages which do not need a response
- And much more…
All these features are explained below.
Start a new customer conversation?
There are several different ways for you to start conversations with you customers. You can search for a customer and strike up a new conversation with them, or you can start from scratch by entering in contact details for the customer that you want to reach.
Starting a Conversation using Quick Compose
- To start a new customer conversation, click the Quick Compose button in the top left-hand corner.
- Once you click the Quick Compose button, the Message Compose box will appear.
- Once you’ve sent the message, make sure to update the customer’s profile with the name and any additional contact information you may have (Name, Email, Phone #). Do so by clicking on the “Profile” tab in the top right-hand corner of the Dashboard after you’ve sent your message.
Starting a Conversation using Search
- To search for a customer to start a conversation, click the Search button in the top left-hand corner.
- Once you click the Search button, the Search box will appear.
- Start to type in their name or contact information and, if the customer already exists in the Customer Directory, his/her information will be displayed. Click on the customer’s name and you will be able to compose and send a message.
- If the customer does not exist in the Customer Directory, follow the steps above in the Starting a Conversation Using Quick Compose section.
Respond to notification emails
Another way to respond to customers from your mobile devices is via the Email Notifications that you receive in your inbox.
You receive two types of Email Notifications.
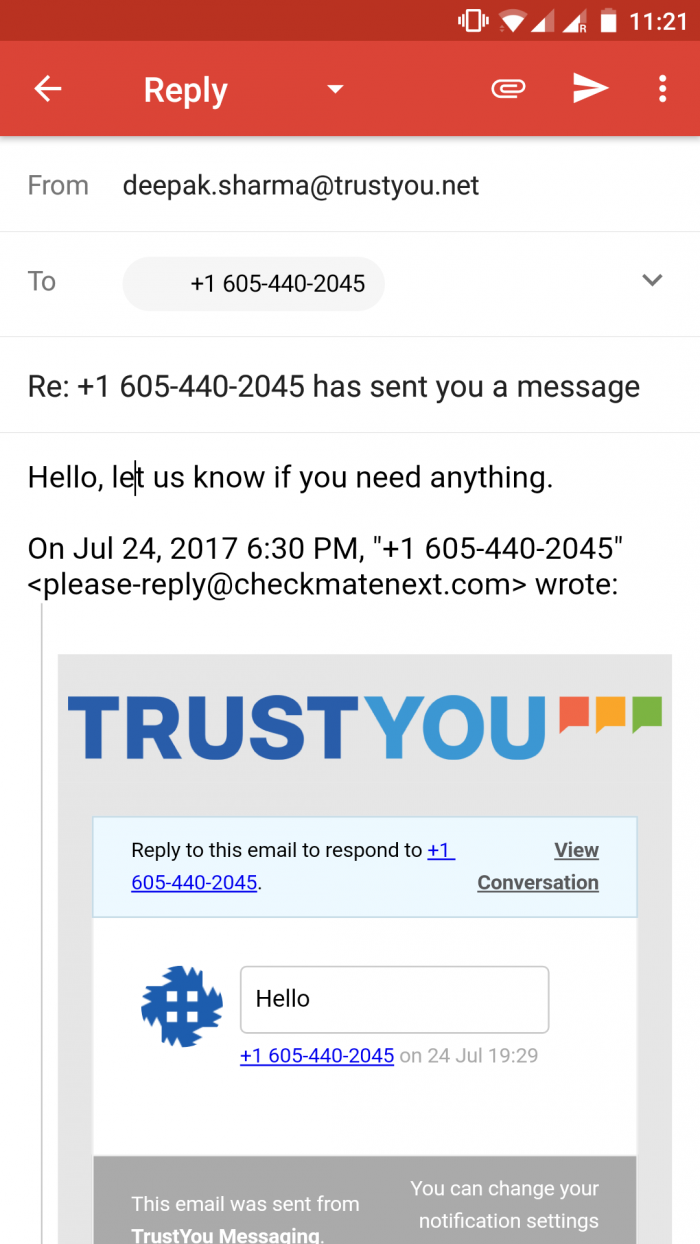
- Customer Message Notification: this lets you know a customer has sent you a new message. The notification will contain the contents of the customer’s message to which you can reply straight from your email inbox to respond to the customer’s inquiry.
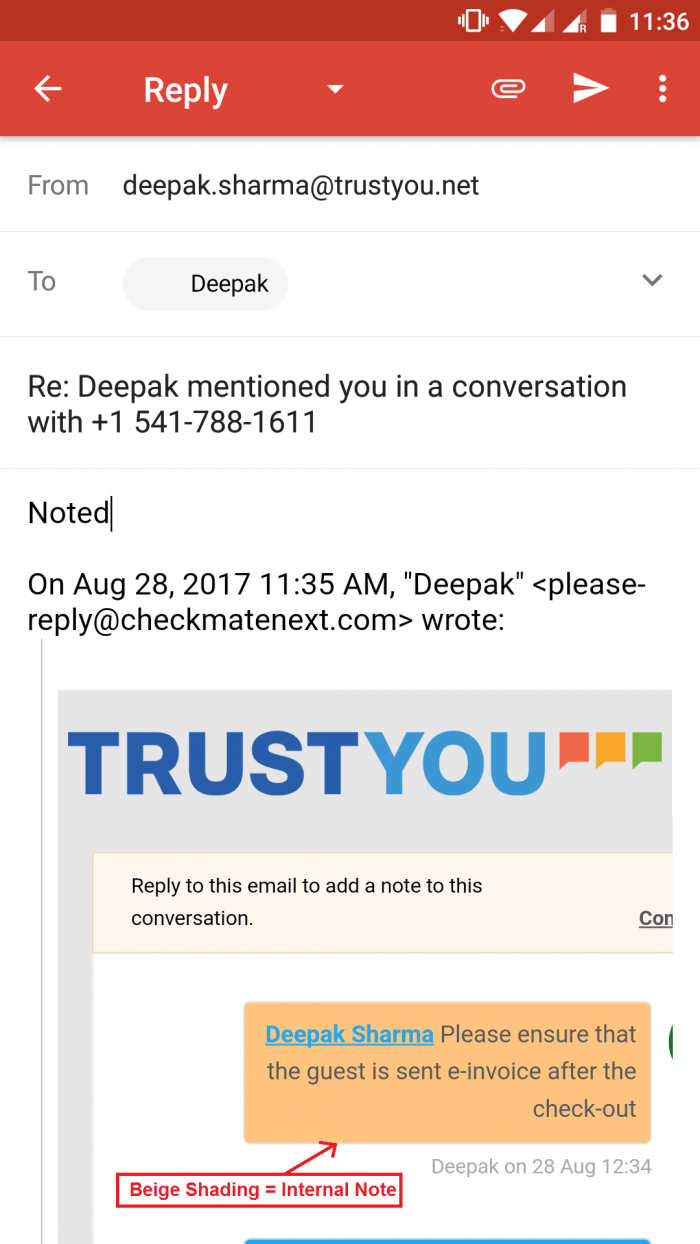
- Internal Note Notification: this lets you know that someone in your organization has mentioned you directly or a team that you’re a part of in a customer conversation. These notes are for your and your team’s eyes only. Reply to this type of email notification from your email inbox if you would like to send a note back to the team member(s) who mentioned you.
While it’s a suggested best practice to use the TrustYou Messaging Dashboard whenever possible, this feature is ideal when you want to respond to customer or team members quickly while still working in your email inbox.
Example 1: Customer Message Notification Response
- Respond to the customer from your own inbox: “Reply” to the email notification. Your email response to the Customer Message Notification will automatically update your TrustYou Messaging Inbox and will count the conversation as “handled” so the rest of your team knows that you’ve taken care of that particular customer.
NOTE: the customer will see this message.
- Messaging Inbox updates:
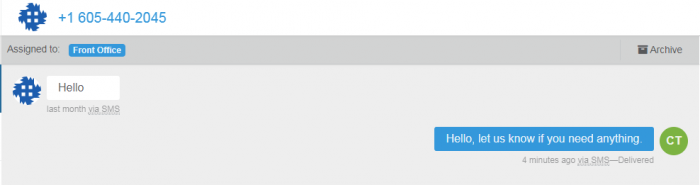
- How it looks to the customer: These type of replies will look just like the other messages you send to your customers (or ones they receive from their friends).

Example 2: Internal Note Notification Response
- Respond to team member notes from your inbox: Email responses from your personal inbox to an Internal Note Notification will be added and logged in the TrustYou Messaging Inbox as an Internal Note *only.* Customers won’t see this message.
- TrustYou Messaging Inbox updates with a new note: only Team Members will see this and receive notifications.
A little more information on how it works:
- Each message on the dashboard has its own specific ID.
- Each notification you receive is coded with that specific message ID.
- Your response to that notification via email adds your reply text to the appropriate message ID and either update the customer and/or the team member(s) depending on the type of notification (Customer or Internal Note).
- All text written, above the Original Notification, in the Reply will be added to the message sent through TrustYou Messaging (Special Note: be mindful of any Signature in the body of your reply to Customer Message Notifications, as it too would be added to the Message).
Assign a message to a team
You can assign messages to one or many Teams within your business, which helps the team collaboration with customer communications!
Within a conversation in your “Inbox”, navigate to the “Assign to” bar at the top of the conversation you’d like to reassign. Click the “Add Team” drop-down to select the new team you’d like to include in the conversation.

Should you want to remove any team from a conversation, you can hover over the team name (in blue) and click the ‘x.’

Don’t forget! Any unassigned messages with automatically be assigned to your “Default” Team. Not sure which team is your Default? Click on “Manage Teams” under “Settings” to see your “default” team.
Add attachments or emojis to messages
You have the ability to send both attachments and emojis to your Customers.
To do so, first, go to the conversation with the customer that you would like to send an attachment or emoji to.
To send an attachment, use the paper clip icon in the bottom right-hand corner of the Customer Conversation.
Navigate to and select the file that you would like to attach from your computer. Then, click “Send Message”.
To send an emoji, use the smiley face icon in the bottom right-hand corner of the Customer Conversation.
Select the emoji that you would like to use. Then, click “Send Message”.
Use saved replies and template variables
Saved replies allow you to store messages that you frequently send to customers. For example, you may wish to create a “Welcome Message” that you can use to send to customers the first time you send them a message.
Saved replies can also include template variables, that allow you to personalize the content of your message. For example, if you wanted to include a customer’s first name in a message, you can use : {{customer.name | default:’there’}}. The text marked default will be displayed if the customer’s name is not already stored in the system.
The complete list of template variables you can use in saved replies includes:
- {{business.name}} – name of your business configured in your account settings
- {{customer.name}} – full name of the customer
- {{customer.first_name}} – first name of the customer
- {{customer.last_name}} – last name of the customer
- {{user.name}} – full name of the signed in user
- {{user.first_name}} – first name of the signed in user
- {{user.last_name}} – last name of the signed in user
- {{user.title}} – title of the signed in user
Example Saved Reply Template: here is an example of a saved reply template.
Hello {{customer.first_name | default:’there’}}. If you have any questions or need any help, you can reply here to reach our team. Best, {{business.name}}
Example (with customer name present): here is an example of the message that would be generated using the saved reply template above.
Hello Anthony. If you have any questions or need any help, you can reply here to reach our team. Best, TrustYou
Example (without customer name present): here is an example of the message that would be generated using the saved reply template above.
Hello there. If you have any questions or need any help, you can reply here to reach our team. Best, TrustYou
Internal notes and mentions
TrustYou Messaging helps your team collaborate internally around customer requests. Using internal notes is an easy way to keep your entire team updated and to notify your colleagues and teams when their help is needed.
Internal notes
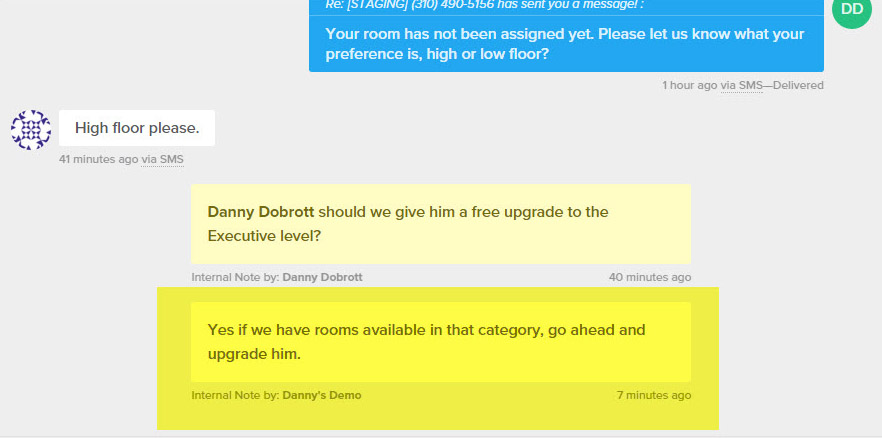
When you create an internal note, the content of your note will be displayed on the conversation, but will not be sent to the customer.

Using @mentions with internal notes
You can also use the @mention functionality to notify other users or teams when a conversation requires their attention. When composing an internal note, simply type the @ sign to select a person or team that you’d like to mention. After adding your note, the person or entire team will be notified by email and within TrustYou Messaging.

Switch between Text or Email when sending a message
You can easily switch between Texting or E-mailing your customers. You’ll just need to add their Email or Phone Number to their contact details and choose how your current message will be sent.
Adding Contact Details:
Access your customer’s Contact Information page by Clicking on their “Profile” from the upper right-hand corner of the conversation. (Click on their Contact Email or Phone Number if their name wasn’t already entered).

Here you can “Add” their Email or Phone Number. Note: you can add multiple Emails and Phone Numbers to contact your customer.

Choose how to send the message:
From the drop down menu at the bottom of the conversation, select how you want to send the message.

Any response or message via Text or Email will appear in that customer’s unique message thread.
Respond to Facebook Messages from TrustYou Messaging
TrustYou Messaging´s integration with Facebook messenger allows you to respond to Facebook messages from your customers. To set-up your Facebook messenger integration, you’ll need:
- Admin access to TrustYou Messaging
- Admin access to your company’s Facebook Page
To get started, sign-in to your TrustYou Messaging account and navigate to your Settings.
- Navigate to Settings > Business Settings > Manage Channels in the left sidebar of your TrustYou Messaging account
- Click on Facebook Messenger section
- You may need to “Log-in” to your Facebook account here
- Identify the page you would like to manage through TrustYou Messaging and click “Connect Page”
That’s it! Messages sent to your company’s Facebook page will now be routed to your Messaging account.
Include Facebook message buttons on your website and in your emails
With TrustYou Messaging’s Facebook messenger integration, you can make it even easier for your customers to message you through Facebook. Once you’ve configured your Facebook page integration with TrustYou Messaging, you can add message buttons to your websites and emails.
Adding Messaging to Your Website
- Log-in to your TrustYou Messaging account
- Navigate to Settings > Business Profile
- Copy and paste the JavaScript code into your website
Adding a “Message Us” button elsewhere
- Log-in to your TrustYou Messaging account
- Navigate to Settings > Business Profile
- Copy and paste the “Message Us” code wherever you’d like to include a message us button.
Get incoming Messages from Amazon Alexa or any other Voice based system
TrustYou Messaging supports integration with Voice based system like Amazon Alexa devices (Echo, Echo Dot and ….). New generation hotels are adding these devices to their rooms to improve the guest experience. With this integration, guests will be able to send messages to your account. For setting up this integration, please get in touch with our client success team – service@trustyou.com
Difference between active and archived message
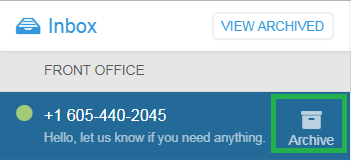
TrustYou Messaging helps you keep track of customer messages that require a response from your business. Your Inbox contains messages that require a response. Customer messages that do not require a response are located in your Archived messages.
How to Archive a Message: To archive a message from within the Inbox, hover over the customer’s message and click the “Archive” icon.
How to View Archived Messages: To view a customer message that has been archived, click the “View Archived” button.
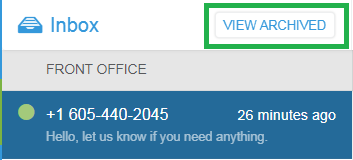
This will bring you to your list of Archived Customer Messages.
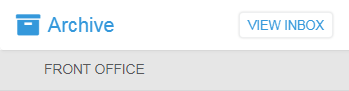
How to Unarchive a Message: To unarchive a message, first navigate to the Archive folder. Select the Customer Message that you would like to unarchive then click the “Unarchive” button.

Please note that all the scheduled messages will be considered as Archived messages unless guests respond to them.
Delete a conversation
Conversations in TrustYou Messaging are never deleted, so you will always have access to prior conversations with your customers.
If a message does not require a response, you can mark the message as “Archive”. This will remove the message from your list of “Inbox” messages.
To do so, click “Archive” in one of the two locations in the application.

Search for a customer
Need to search for a past Customer to view their conversation thread or send them a new message? Use the Search functionality to quickly pull up the Customer’s information.
The Search button is in the top left-hand corner of the inbox.

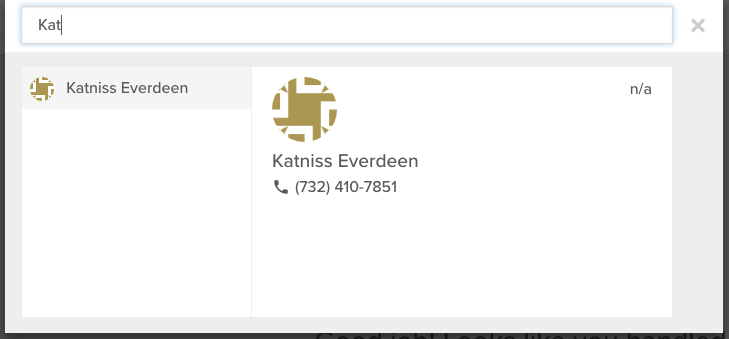
When you click the Search button, the Search box will appear.

As you start to type in the Customer’s name into the Search bar, relevant matches will be displayed in a list below. Click on the Customer that you are searching for to bring up the conversation thread with that customer.
You can also search for the Customer by clicking Compose green button in the top left-hand corner to start a new conversation and begin to type in the customer’s name.
Delete a team
When deleting a team in TrustYou Messaging, you don’t need to worry about losing any customer messages or information. All messages associated with or assigned to the deleted team will be moved and re-assigned to the team that you have designated as the default team (i.e. Front Desk, Customer Service, Reception, etc.).
Using Customer Notes
Leverage the Customer Notes functionality to ensure that your team has everything that they need (at their fingertips) that would help them in serving a customer. Add a note for evergreen information that would be helpful to know or have each time you’re dealing with a specific customer.
To add a note, pull up the customer’s conversation and click Add Note.

Type in the notes you’d like to add then Save.
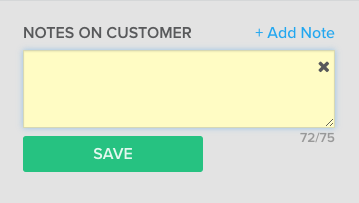
You can add as many notes as you’d like. You can also remove notes if the information is no longer relevant.

System requirements for mobile use of TrustYou Messaging
You can use TrustYou Messaging to respond to customers, create internal notes, use saved replies and even assign conversations to other teams right from your mobile device. The best part of this is that you don’t have to download (or update an app) in order to take advantage of responding to your customers on-the-go. You can bookmark the site in your mobile browser, and you can even save it straight to your phone’s home screen for easier access.
To do this on your iPhone, it’s just a few simple steps:
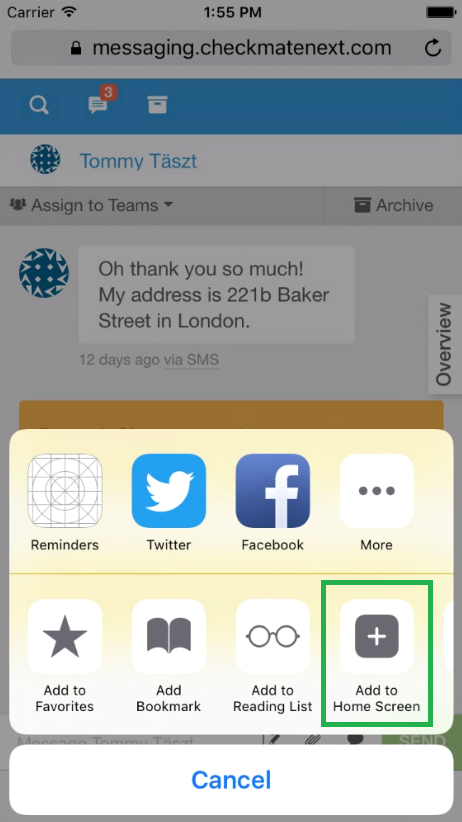
1. Visit your TrustYou Messaging Business URL in Safari. (Note: this capability is only available in your iPhone’s native browser, Safari.)
2. Click the Share icon from the bottom browser menu.

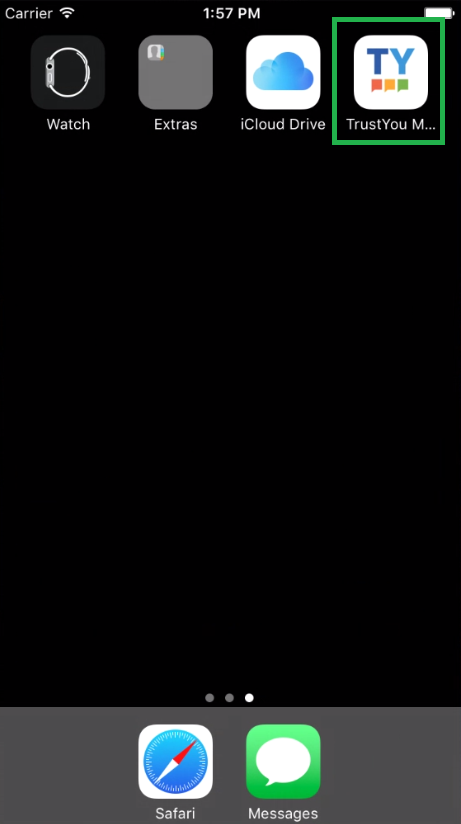
3. Choose the Add to Home Screen option and Add.
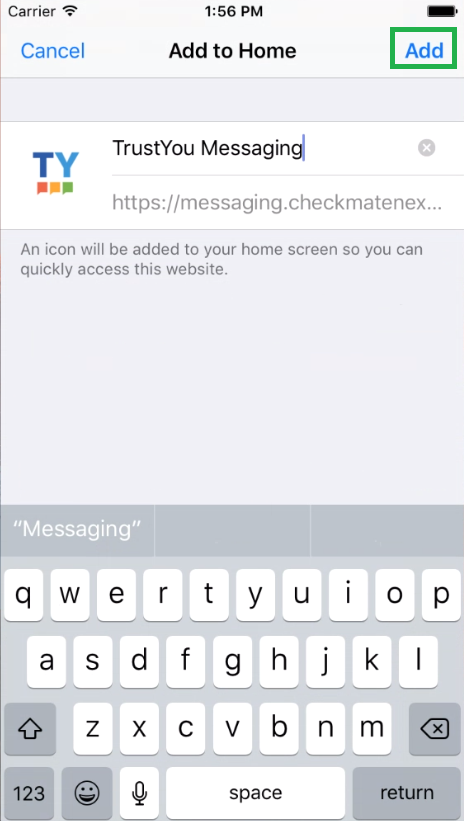
Voila! You have customer conversations at your fingertips.
To do this on an Android device, it’s just as easy:
1. In Chrome, tap on the three dots at the top-right corner and select “Add to Home Screen” option.
Outreach
How can I obtain permission to contact my customers?
The Importance of Obtaining Permission
It is important that TrustYou Messaging customers obtain consent from their customers/end users prior to sending texts and emails using the TrustYou Messaging service. Obtaining consent is not only common courtesy, but it is required by anti-spam and other privacy and consumer protection laws around the world. The consequences for not following the rules can be quite severe, with penalties in the U.S. of $500-$1,500 per message in the case of text messages and penalties of up to $16,000 per message in the case of emails.
It is your responsibility to ensure that all necessary consents have been obtained and recorded in compliance with applicable law. This issue highlight is provided as a courtesy and is not intended as legal advice. TrustYou Messaging customers should consult with their own legal counsel to ensure they are in compliance with applicable laws.
I. Consent for Email
A. What type of consent is required?
In the U.S., senders of commercial emails are not required to obtain express consent prior to sending their messages. Instead, the CAN-SPAM Act requires senders to provide an opportunity for recipients to opt out of receiving future commercial emails and to honor that opt-out request within 10 business days. To that end, commercial email messages must include a clear and conspicuous instruction that explains how the recipient can opt out of receiving future emails from the sender, such as a return email address or another easy Internet-based way to allow people to communicate their choice. Senders may create a menu to allow a recipient to opt out of certain types of messages, but one of the options must be to opt out of all commercial messages from the sender.
In addition to an opt-out requirement, the CAN-SPAM Act imposes various content requirements for commercial emails, such as accurately identifying the sender of the email, identifying the email as an advertisement, and including opt-out instructions. These content requirements are not limited to just bulk email but apply to all commercial messages.
B. Best Practices
Here are some tips for best practices when it comes to commercial emails:
- Do not use false or misleading header information. Make sure that your “From,” “To,” “Reply-To,” and routing information – including the originating domain name and email address – is accurate and identifies your business as the originator of the message.
- Do not use deceptive subject lines. The subject line should accurately reflect the content of the message.
- Identify the message as an advertisement, in the subject or body of the message.
- Include your contact information, including a valid physical postal address. This can be your current street address, a post office box you’ve registered with the U.S. Postal Service, or a private mailbox you’ve registered with a commercial mail receiving agency established under Postal Service regulations.
- Check with your legal counsel to ensure that your messages comply with then-current legal requirements, as these may be updated from time to time.
- Clearly tell recipients how to opt out of receiving future email from you. Craft the notice in a way that’s easy for an ordinary person to recognize, read and understand (e.g., using different type sizes, colors and location can improve clarity).
- Make sure that your spam filter does not block opt-out requests and do not charge a fee for opt-out requests or make the recipient take any step other than sending a reply email or visiting a single page on an Internet website as a condition for you honoring an opt-out request.
- Honor opt-out requests promptly. You may create a menu to allow a recipient to opt out of certain types of messages, but you must also include an option to opt out of all commercial messages from you.
- Maintain your database and remove anyone who opts out, regardless of how they express their desire to opt out.
- Monitor your service providers to make sure that they are complying with the law. Under the law, both the vendor and the advertising company may be held responsible even if the vendor breaches the contract and violates the law.
If sending email messages to recipients outside of the U.S., check on local consent and content requirements in the country where the recipient resides.
II. Consent for Text Messages
A. What type of consent is required?
The consent required for text messages differs under U.S. law depending on whether the message is an informational text message or a marketing text message. If the message has any content that might be viewed as advertising or promoting any products or services then it should be treated as a marketing text message.
1. Informational Text Messages
For purely informational, non-marketing text messages, U.S. law requires that the recipient provide prior express consent. Prior express consent can be obtained in a variety of ways, including by implication when a person provides their phone number under circumstances indicating they intended to agree to be contacted using that number. Thus, for purely informational text messages, it is easier to demonstrate that the legally required consent has been obtained.
2. Marketing Text Messages
For marketing text messages, U.S. law requires that the recipient provide prior express written consent. Prior express written consent can be obtained through a signed, written agreement that clearly and conspicuously discloses to the prospective message recipient:
- The prospective message recipient authorizes the sender to deliver marketing text messages using an automatic dialing system to a designated phone number; and
- Consent is not required as a condition of purchasing any products or services.
The required signature for the written agreement can be obtained in any manner that complies with applicable state or federal law, including via e-mail, website form, text message, telephone key press or voice recording.
B. Best Practices
Here are some tips for best practices when it comes to text messages:
- Since most customers would like to retain flexibility for sending any type of message, consider obtaining consent that meets the requirement of prior express written consent from all recipients in your Outreach database.
- Only rely on prior express consent if you are certain that all of your messages will be purely informational in nature.
- Never assume you have consent to send a text message. Obtain and maintain records of all consents obtained, whether in the form of prior express consent or prior express written consent.
- Check with your legal counsel to ensure that your method of obtaining consent is valid and complies with then-current legal requirements – as these requirements are frequently updated by the relevant authorities.
- Never send text messages to any database you have purchased or acquired from a third party unless you have assured yourself that the persons in that database have consented to receive text messages specifically from you, or that the messages will otherwise be sent in a manner that complies with applicable law.
- Message recipients may opt out of receiving any future messages. Make sure to maintain your database and remove anyone who opts out, regardless of how they express their desire to opt out.
- You may have liability for messages sent to a number in your database if the number is re-assigned to a different person. Consider whether to subscribe to a service to track and alert you if numbers are re-assigned.
- If sending text messages to phone numbers outside of the U.S., check on local consent requirements in the country where the number is issued.
Using Outreach to send messages and surveys to customer segments
TrustYou Messaging’s Outreach builder allows you to easily send personalized messages to a group of customers using data from your customer directory. You can use Outreach to automatically send welcome messages, appointment reminders, and to gather customer feedback. You can also send pre-stay and on-site surveys along with these messages. If you have bought our Survey product then you can also send the post-stay surveys.
This tutorial walks through the steps to create an Outreach message and includes screen shots of each step.
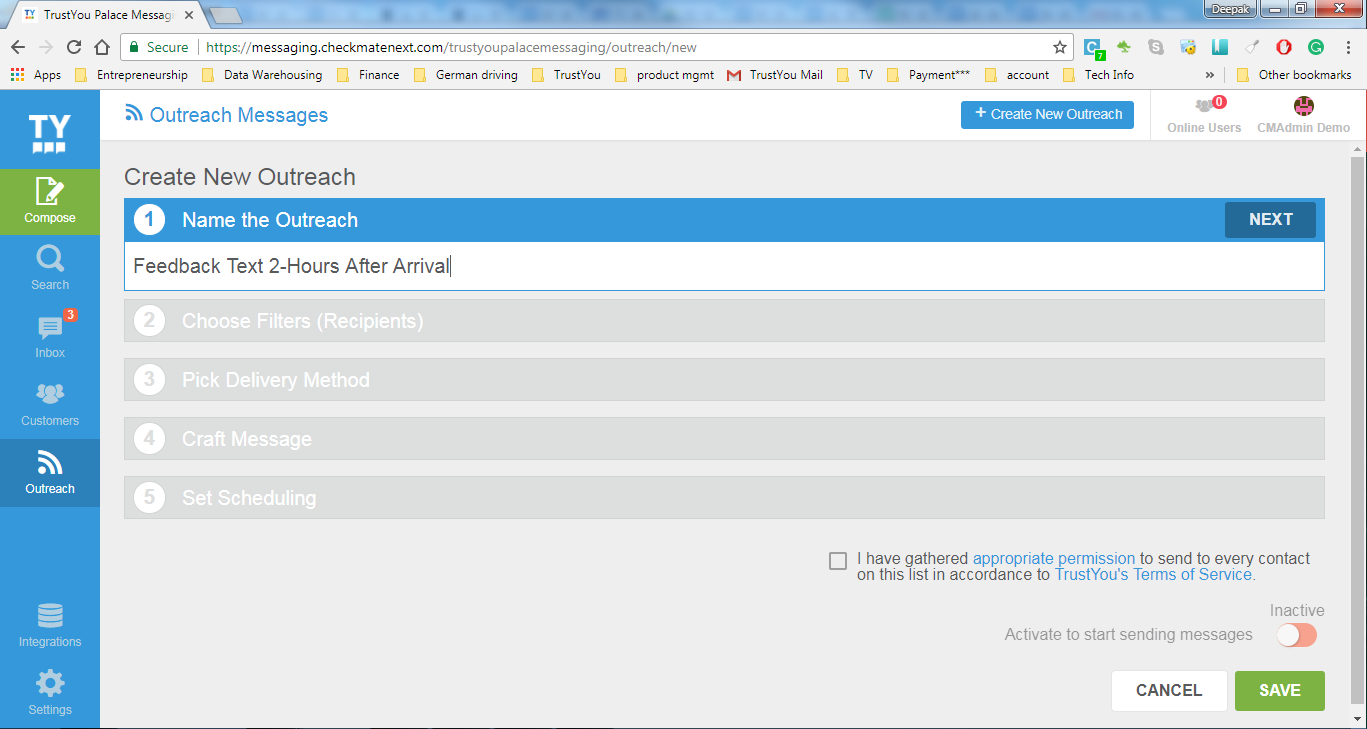
- To get started, click the Outreach tab in your TrustYou Messaging dashboard and select + Create New Outreach.
- Name the Outreach –this name is for internal purposes only and will not be visible to customers. Then click Next.
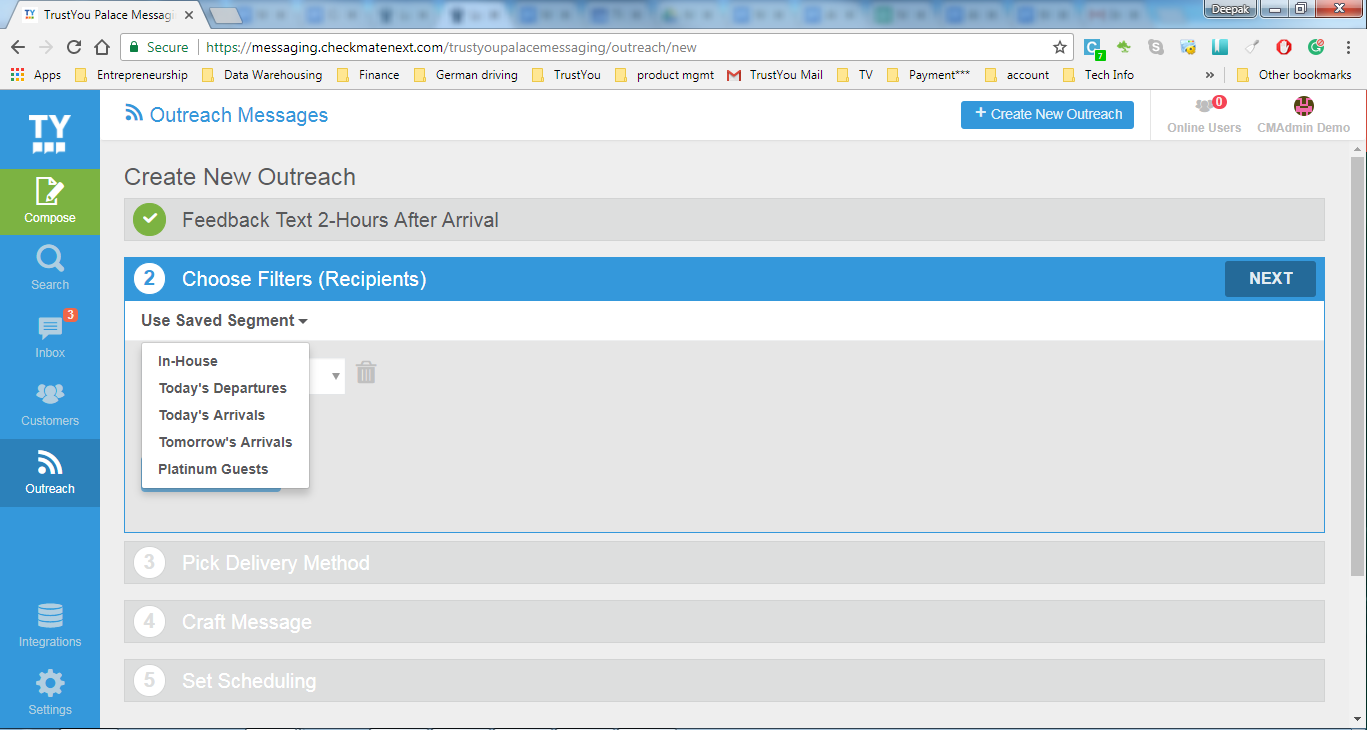
- Choose Filters or Segments – select from one of the segments you defined in the Customer Directory, or apply new filters. Saved segments are filters saved in the past to use them quickly. Filters can be used on any specific field. Most common example is sending an outreach to the customers who are arriving tomorrow. In order to filter those customers, StartAt and Status fields can be used. Choose StartAt field with an operator as “is exactly” 1 “day from now” and Status field with an operator as “is not equal to” “CANCELLED, WAITLISTED”. Please note that these statuses should match with the statuses defined in your customer data.
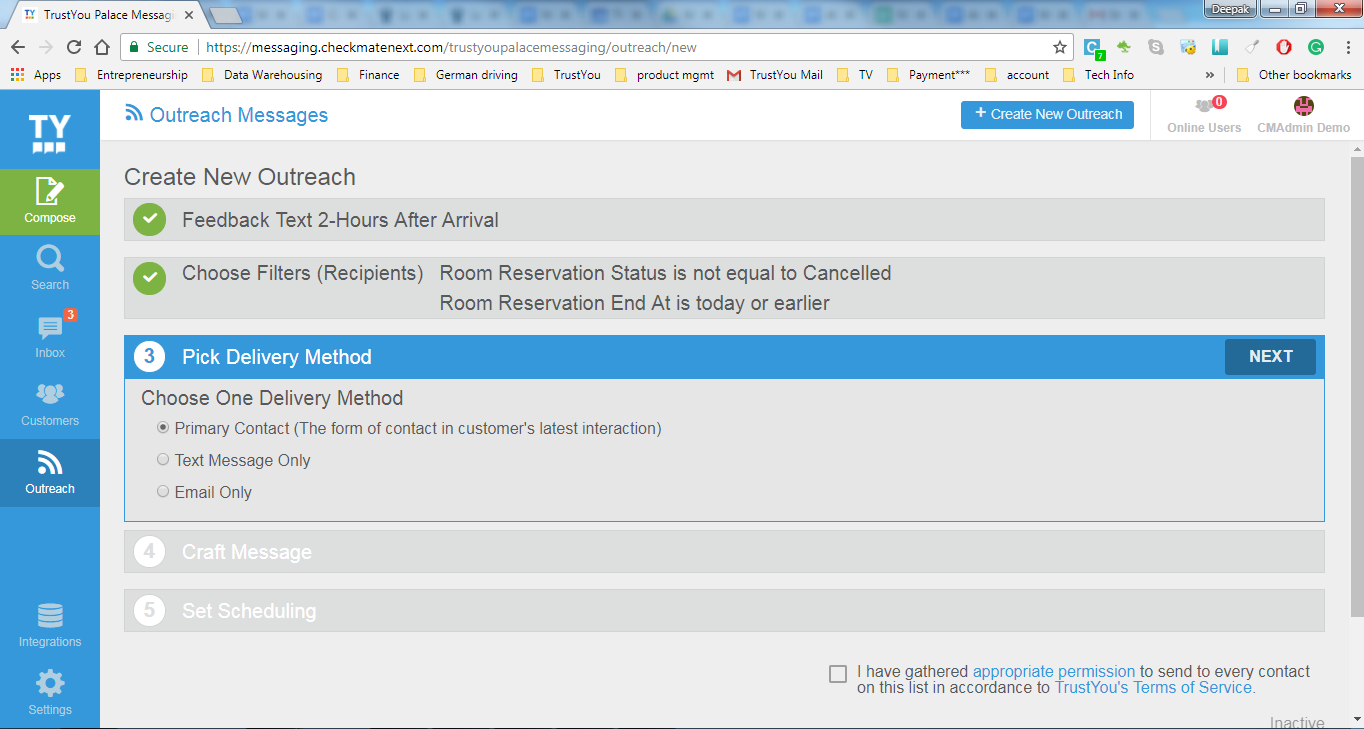
- Pick Delivery Method – you can choose to send your message by text message (only), email (only), or by the last method customer used to interact with your business.
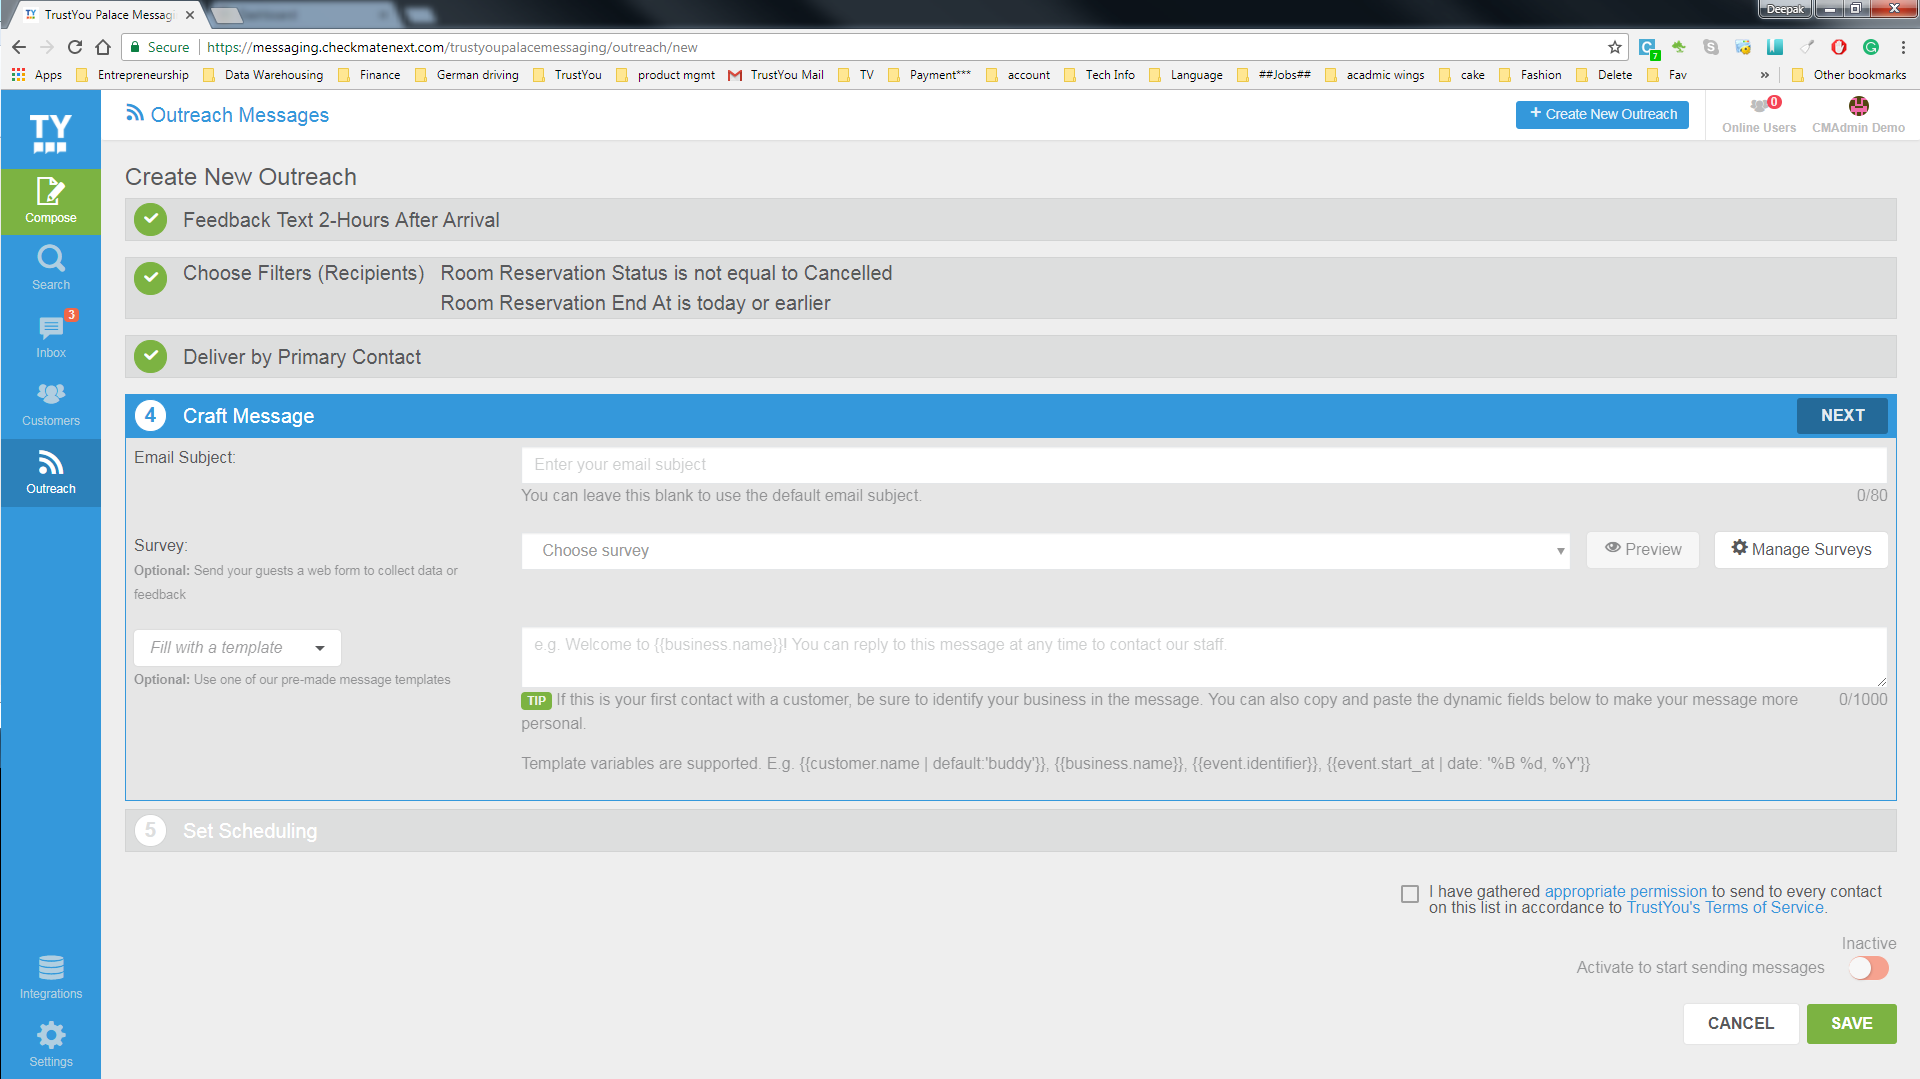
- Craft Message – create the message you’d like to send to your customers. You can use template variables to personalize the message to each individual customer, or include details from events. You also have the option to add pre-stay, on-site and post-stay surveys to your message.
- Use the Manage Surveys button to change or add a new survey. Further information on creating or changing a survey can be found here
- Choose your survey from the drop down menu
- You will see the survey as a placeholder text in the outreach message along with the label of the hyperlink – [Click Here]|{%survey%}. It will be shown as a hyperlink in the guest’s email – Click Here and it will be shown as a short URL in SMS – Click Here – go.trustyou.com/XFDGI. If you want to change the text ‘Click Here’ to anything else then change it in the label.
- Please click on the Preview button to see how your survey looks.
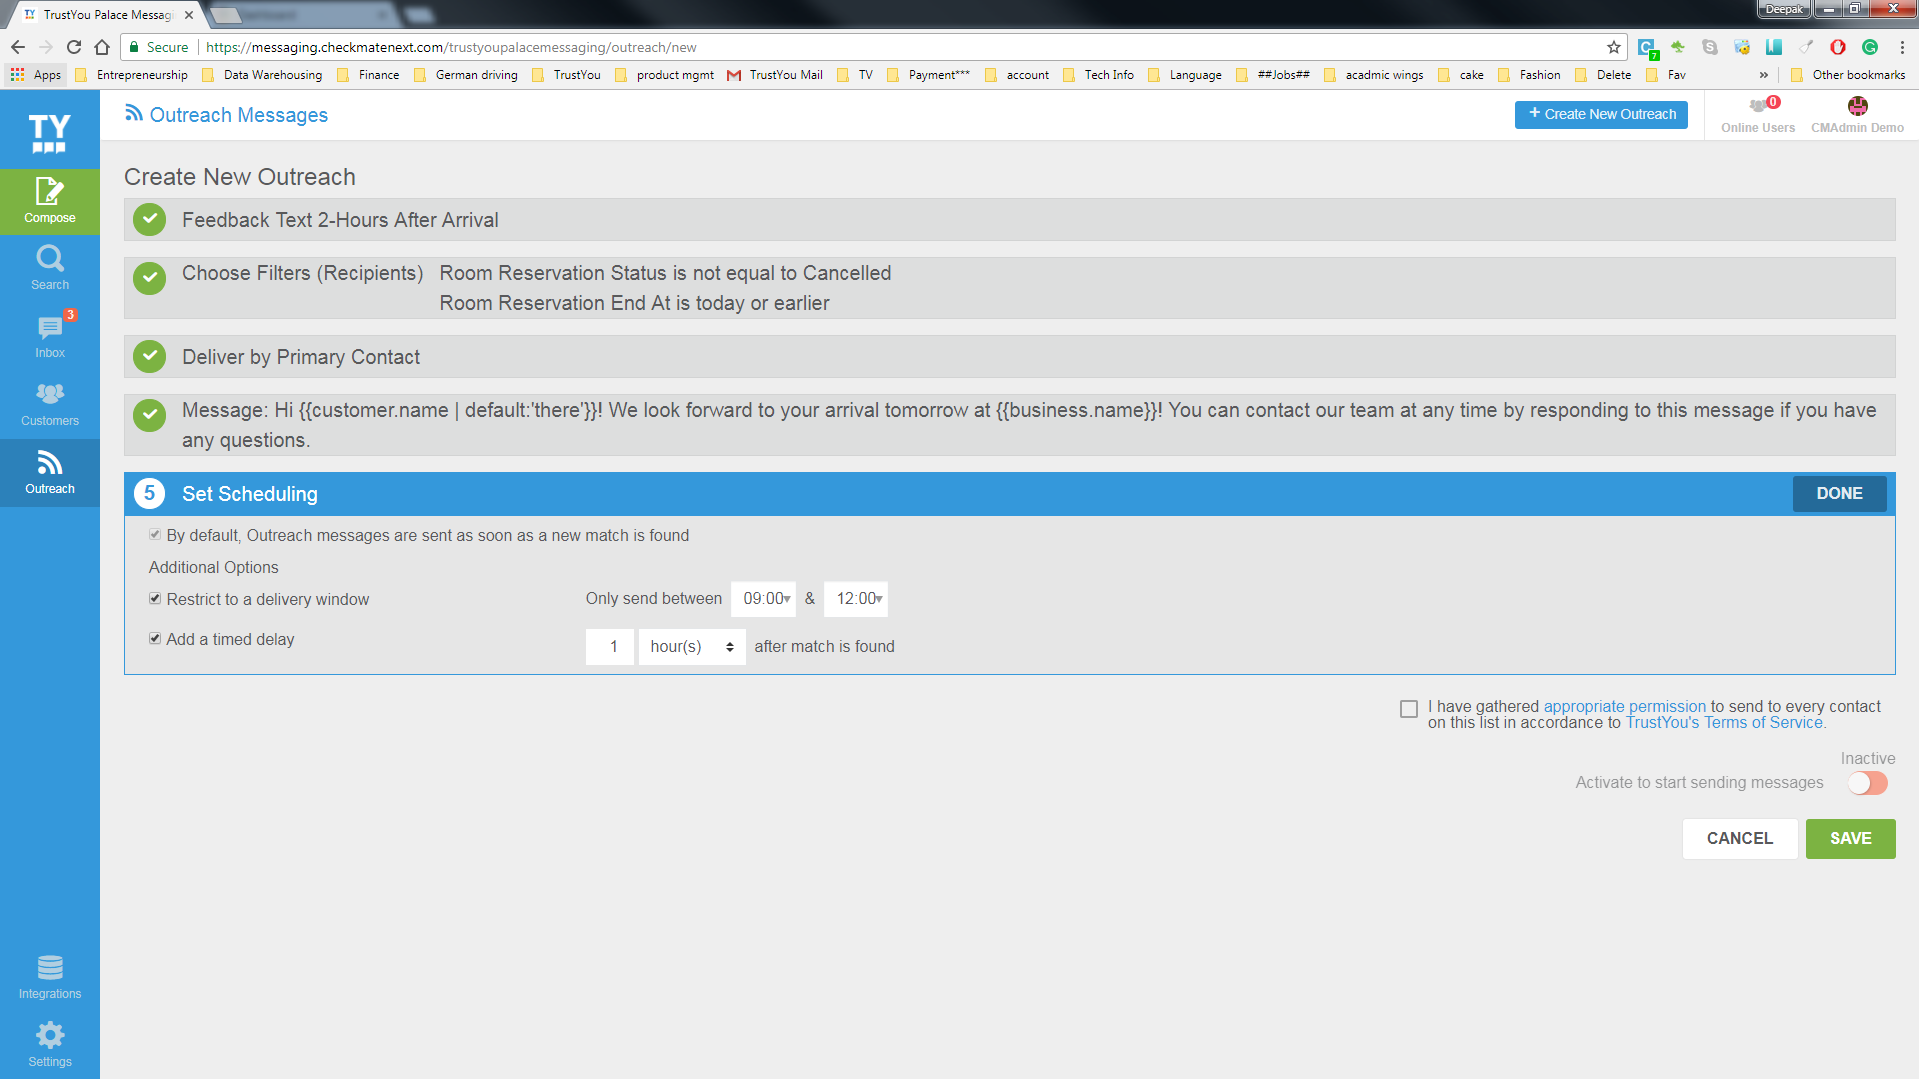
- Set Scheduling –by default, Outreach messages will be sent as soon as a customer matches the Segment or Filter criteria you have defined. However, you can also restrict delivery to a certain time window, or set a timed delay.
- Agree to terms –ensure that you’ve obtained appropriate consent to contact all customers on your list. Then acknowledge the terms and conditions.
- Activate and save –activate your message and save changes. Your message will be sent as soon as customer match your filter criteria.
Statistics
Bar Chart
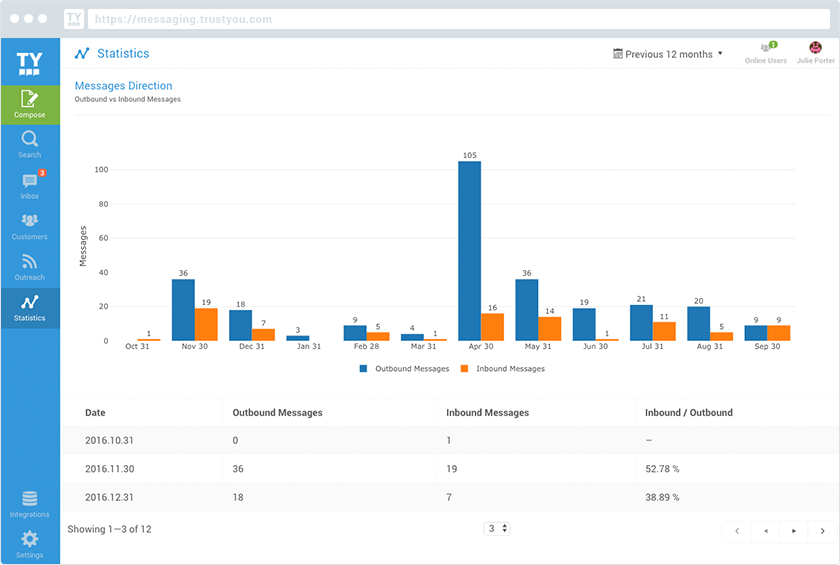
This chart shows you the statistics for Outbound and Inbound Messages for a selected timeframe. To adjust the timeframe, use the selector in the top right corner. According to the chosen timeframe, different time variables are displayed within the chart.
Table Overview
The table overview allows you to see the same KPIs as in the Bar Chart. Additionally, the ratio of Inbound vs. Outbound Messages is calculated as a percentage.
Integrations
File Format
If you are importing file though recurring email integration or manually uploading the file then below is the format of the file defined –
- Supported file types – .csv, .txt, .xls, .xlsx, .json (Only .csv in case of Manual file upload)
- Required fields – Following fields are the mandatory fields required to upload the guest data –
| Fields in the file | Additional comments |
| Name | Guest full name |
| Guest ID, Guest Email, Guest Phone Number | One of these fields is required but it is recommended to provide all three of them. Names can be different in the uploaded file but it should be mapped to right fields in the product. |
| Booking ID | Called “Reservation Identifier” in the product |
| Arrival Date | Called “Start At” in the product |
| Departure Date | Called “End At” in the product |
- Any other fields can be imported in the product (like Booking Status) and can be used to filter the guests while sending them messages
Recurring Email Import Integration
TrustYou Messaging Integrations allow you to automatically feed customer information from your Customer Management System to TrustYou Messaging. Many Customer Management Systems include the ability to schedule CSV exports of data and many will allow users to setup an email address and a frequency with which to email the export.
You can use this functionality to import data into TrustYou Messaging to send automated messages and give your employees better context for their conversations with customers.
*Please note that phone numbers should be uploaded in the E.164 standard international format: as supported by Twilio (https://support.twilio.com/
**Although we support multiple date formats, the preferred format should be yyyy-mm-dd.
To setup a Recurring Email Import Integration, use the following steps:
- Click on “Integrations” in the left panel
- Click on “+ New Integration” in top-right corner
- Click the “Let’s get started” button in the box that says “Recurring Import via Email”.
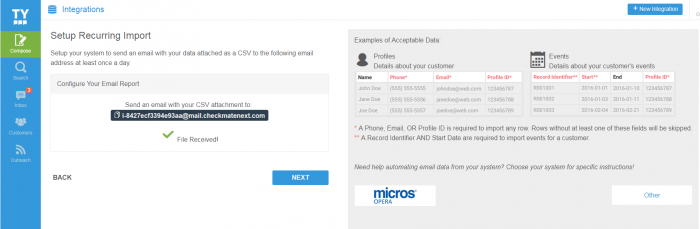
- Setup your recurring import to email data to the email address provided on the screen.
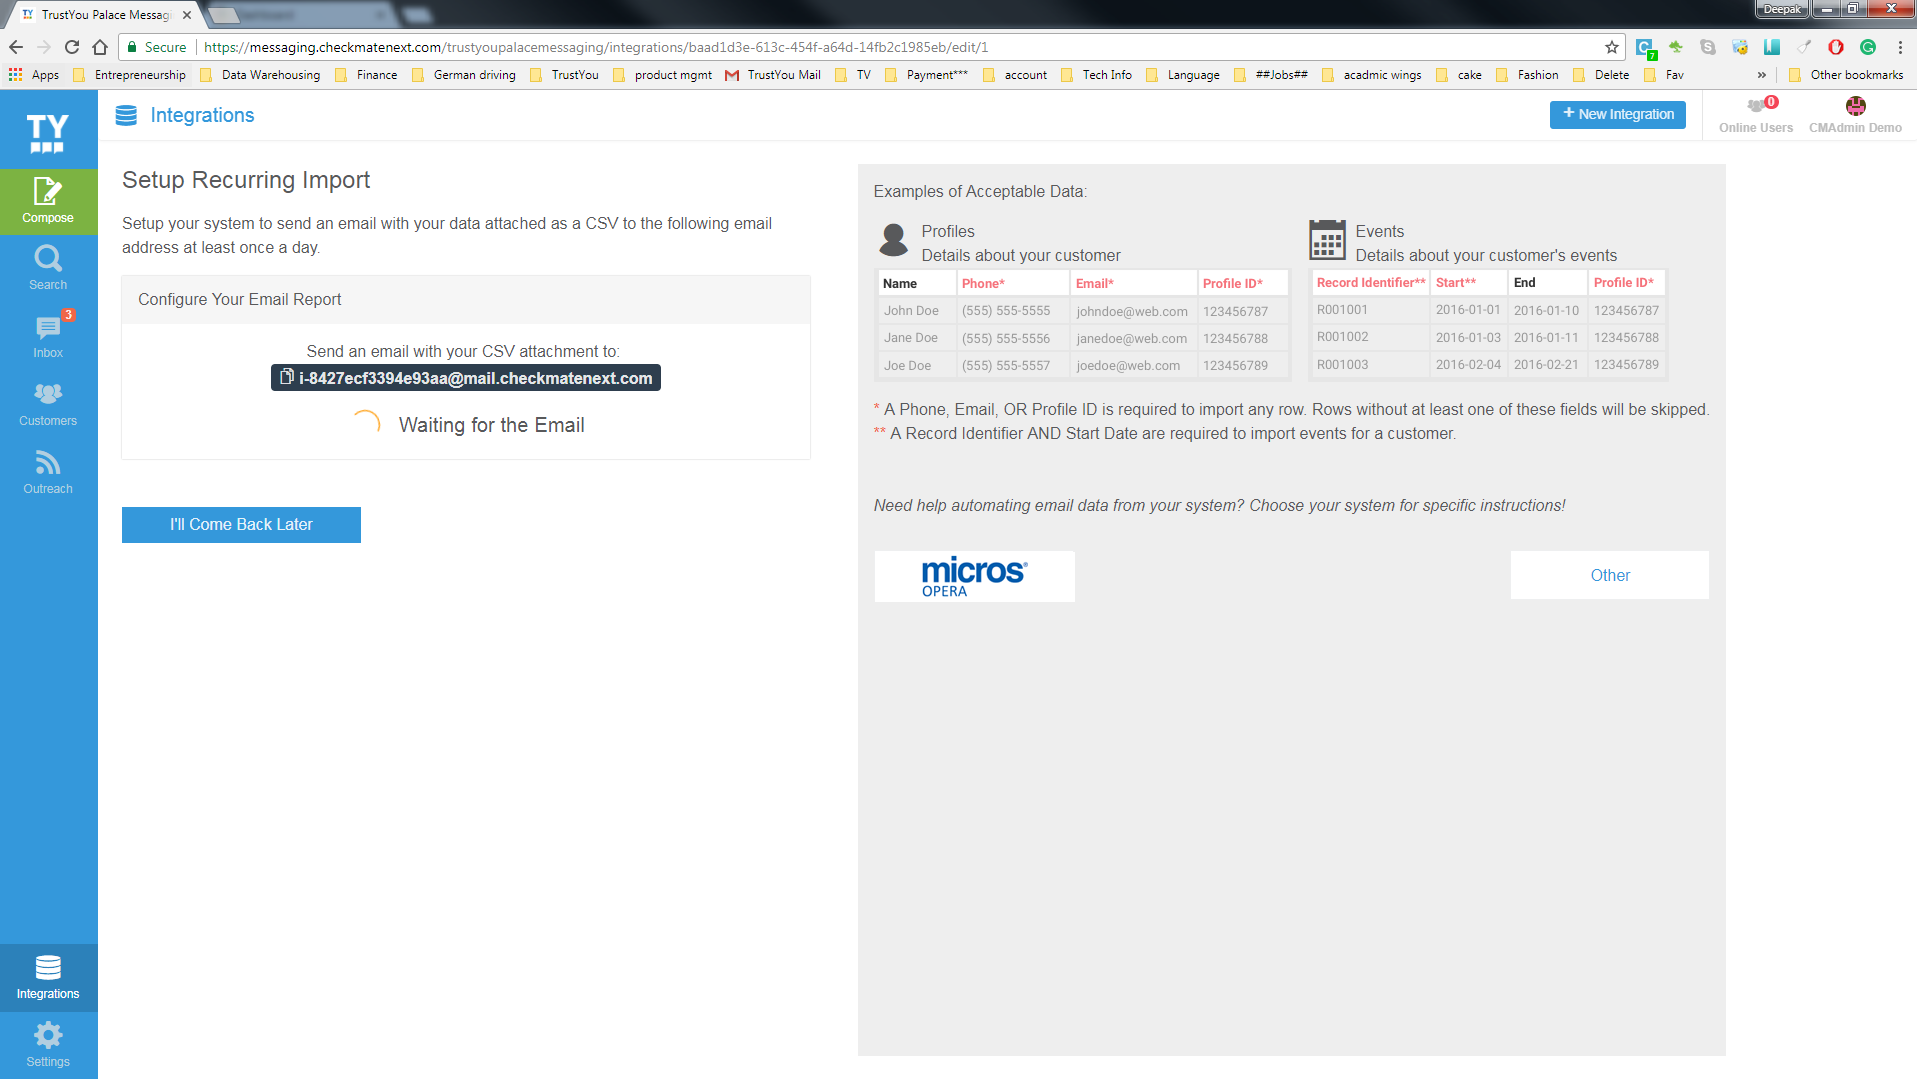
- Once you’ve successfully setup your import from your customer management system and sent your first file via email, click Next to Continue.
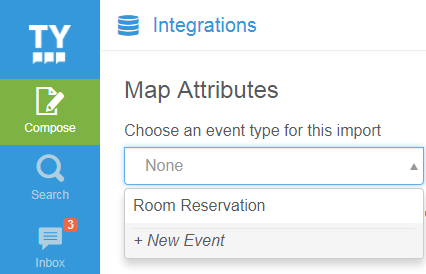
- If the CSV file contains information about Customer Events (Reservation, Appointment, or Visit details ) in addition to basic customer information (Name, Phone, Title, Membership Number) be sure to select an event from the top left. Choose one that appears on the list for your industry or create a new one by clicking “+ New Event”
- If the first row contains Headers, click the checkbox to use headers to auto-map fields when possible.
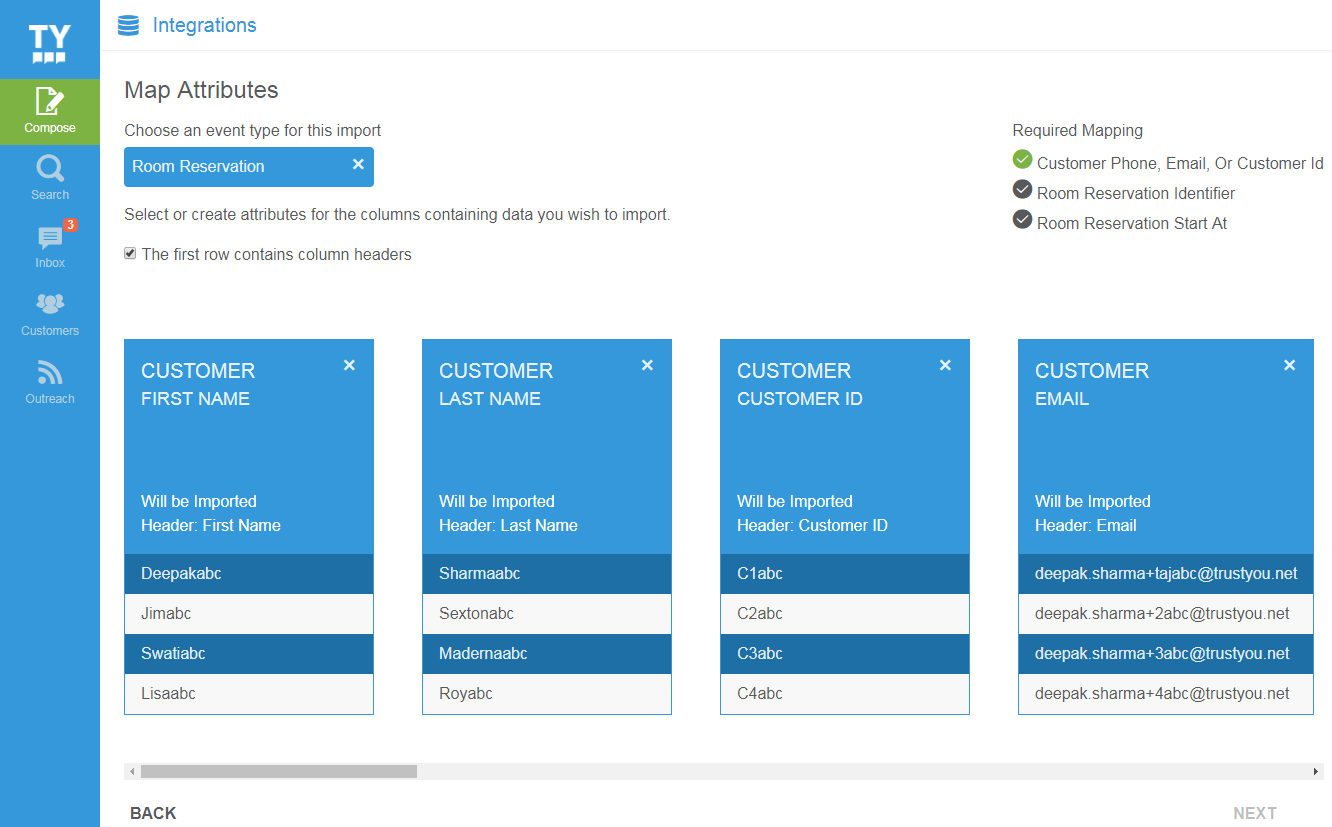
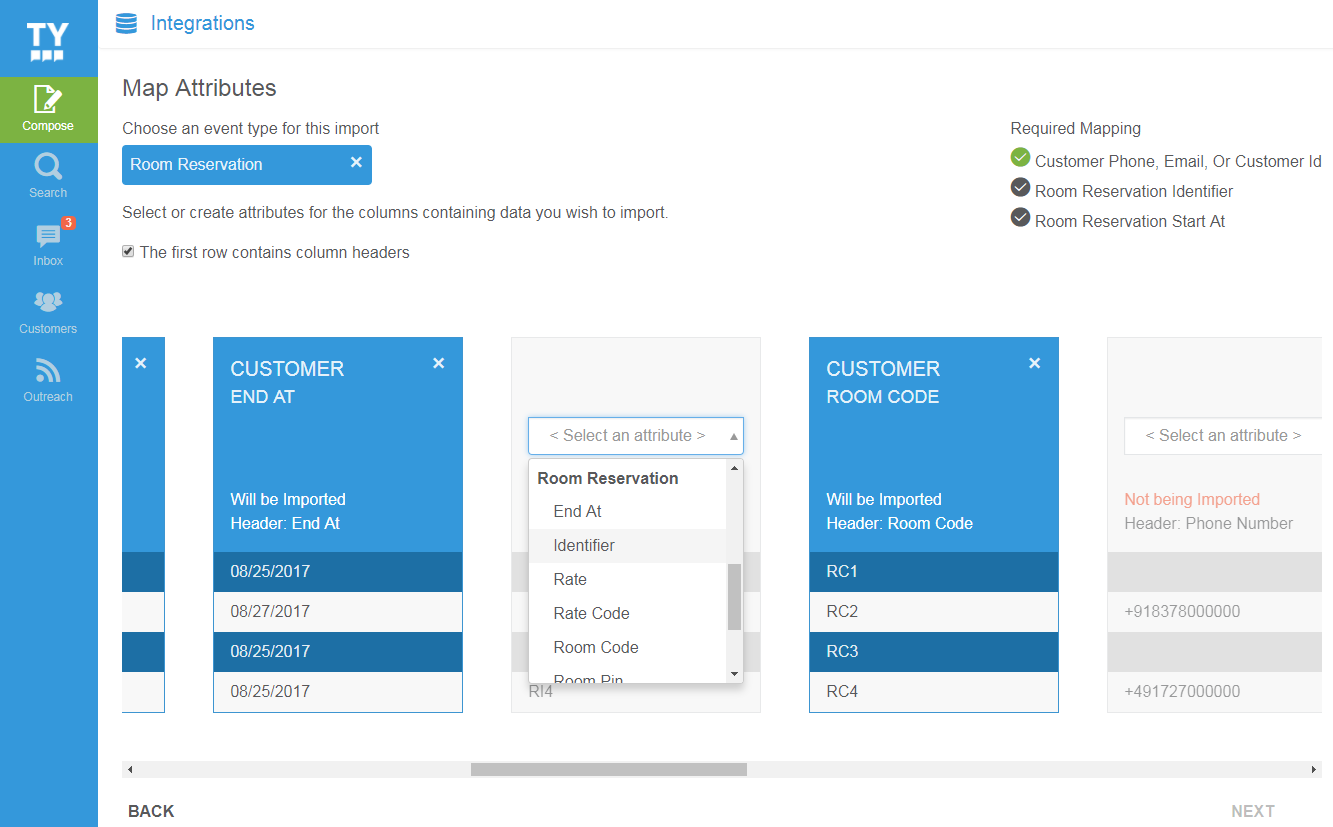
- For any unmapped fields, select the attribute from the drop down or choose “+ New Attribute” to map your data to a new attribute. Some Important Fields:
- Customer Customer ID – Each value in this column should be unique to an individual customer. This is typically a Profile ID or Customer ID from your Customer Management System.
- Event Identifier – Each value in this column should be unique to a specific customer event. This is typically a Confirmation Number or Appointment Number.
- EventStart At – The beginning of an event and required for importing any event. This field accepts Date or DateTime values. For example, this is the Arrival Date for a Hotel Reservation or an Appointment Date & Time for a Massage Appointment.
- Event End At – This is not required for importing events, but can be imported to track the date or time that an event ends. It also accepts Date or Date-time.
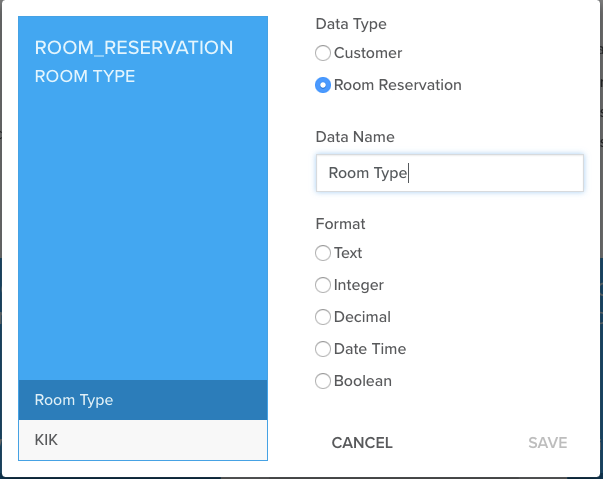
- When creating a new attribute, first decide whether the attribute is a “Customer” or “Event” attribute. Event attributes are details specific to a single event a customer has with you like a confirmation number, or Start At date/time. Customer attributes are more generally about the customer – like Birthday, Customer Preference, Membership Number.
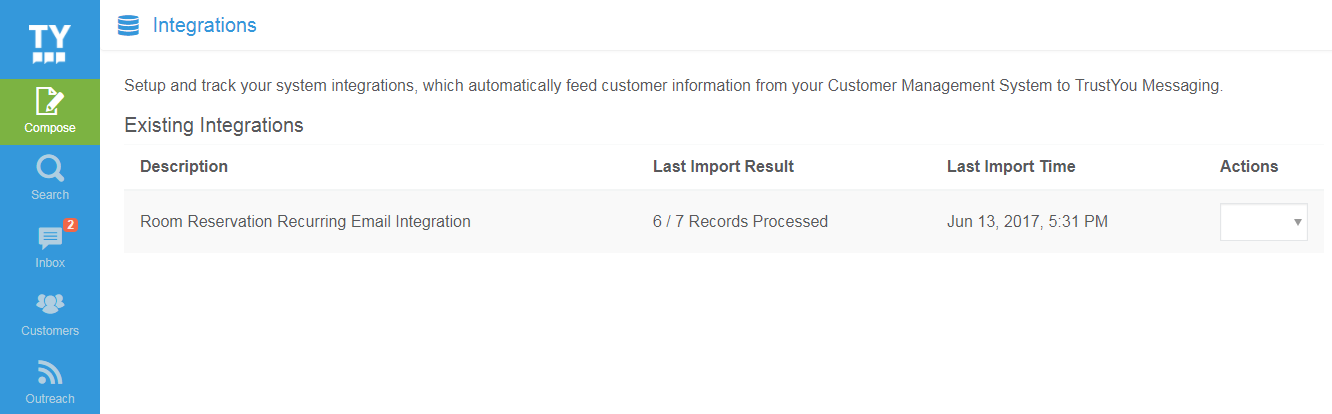
- Once you’ve finished mapping your fields, click “Next” and then “Finish“. You’ll see the status of your Import on the Integration Management Screen. This page will tell you how many customers were imported on the most recent import and when that import occurred.
Manually Importing Customers
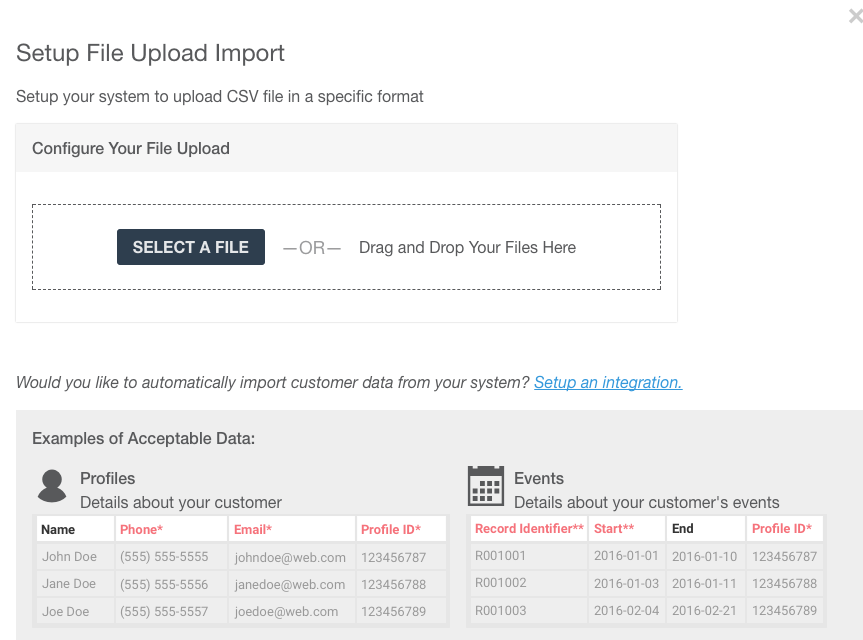
In TrustYou Messaging, you are able to manually upload your guest data from your computer by selecting the + Import Customers option in the Customers section of the platform.
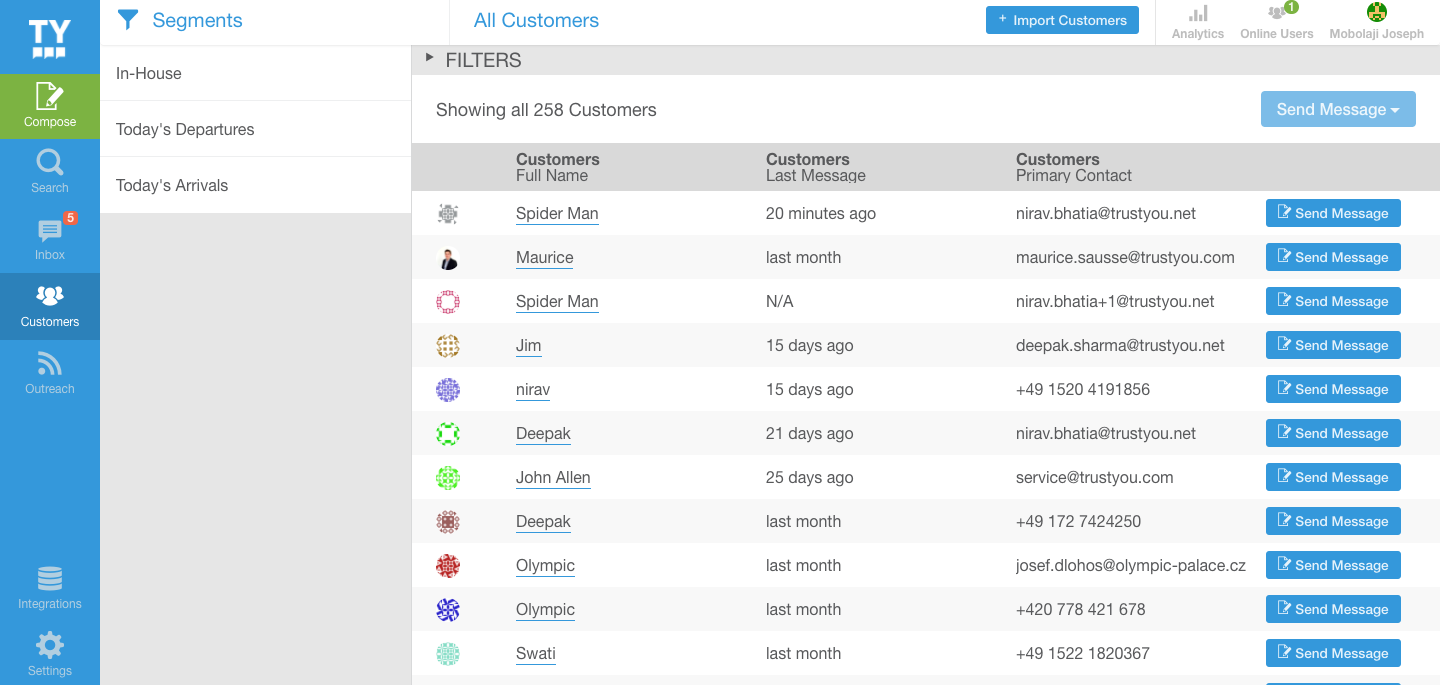
Once you click on “+Import Customers”, select the file you would like to upload onto the platform:
Setting Up a Recurring Import from Micros OPERA
This guide assumes you are at the following step in setting up your integration and are using Micros Opera:
If you use Micros Opera at your property, you can setup an integration with TrustYou Messaging by creating a “Simple Report” and scheduling it for email delivery using the Opera Report Scheduler.
There are 2 parts of the integration setup:
- Part 1: Configure the Integrations Opera Report
- Part 2: Schedule the Report for Email Delivery
Part 1: Configure the Integrations Opera Report
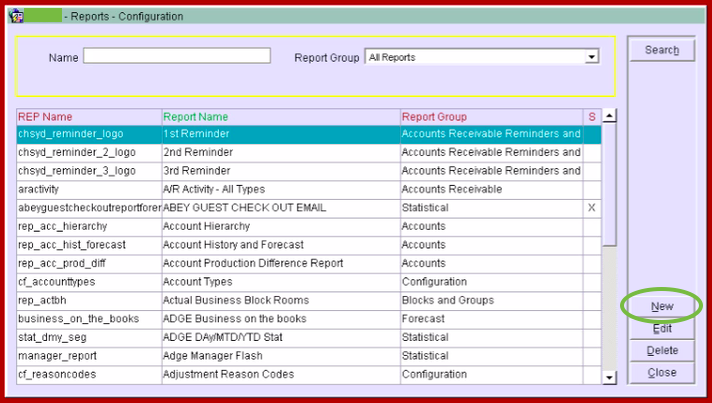
- In the Opera Configuration module, go to Setup > Report Setup > Reports

- Click New to configure the Integrations Opera Report for your TrustYou Messaging Outreach
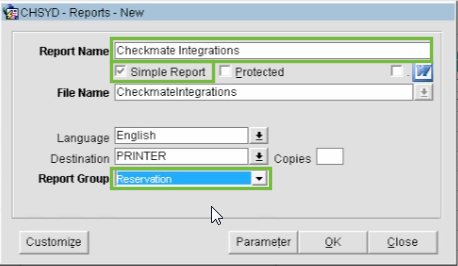
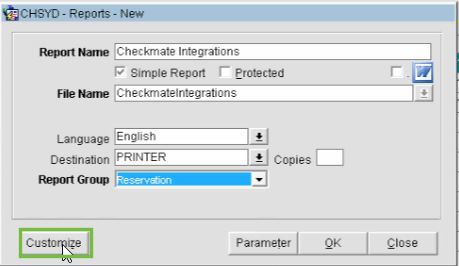
- Update the following basic report fields:
- Report Name: TrustYou Messaging Integrations
- Simple Report: Checked
- Report Group: Reservation
- Note: “File Name” will automatically update when you enter the Report Name.
- Click Customize
- On the first tab, General, click the checkbox next to Reservations and Profiles click Save

- Click on the Columns tab and use the Search and > (“add field”) to add the following fields to the Report Columns. When you click on an Available Column, the red text in the bottom left corner indicates whether a column is a “Profile” or “Reservation” Column.
- Profile Name ID
- Reservation First Name
- Reservation Last Name
- Reservation Email
- Reservation Phone Number
- Reservation Conf Number
- Reservation Arrival Date
- Reservation Departure Date
- Reservation Room Type
- Reservation Room No.
- Reservation Resv Status
- Reservation Total Revenue

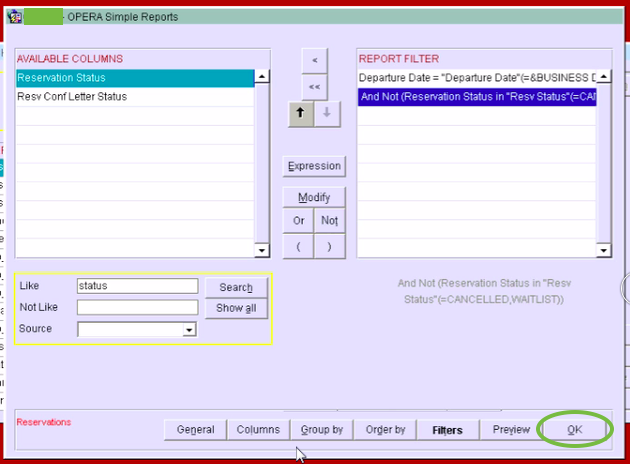
- Click on the Filters tab and use the Search and > (“add field”) to find Reservation Creation Date
- Double click on Creation Date, select the Between radio button and check both Parameter check boxes. Click Save.
- Use the Search and > (“add field”) again to find Reservation Update Date
- Double click on Update Date, select the Between radio button and check both Parameter check boxes. Click Save.
- With the Update Date filter line still selected, click Or
- Click OK to complete the customization of the report
- Click OK to save the TrustYou Messaging Integrations Report configuration
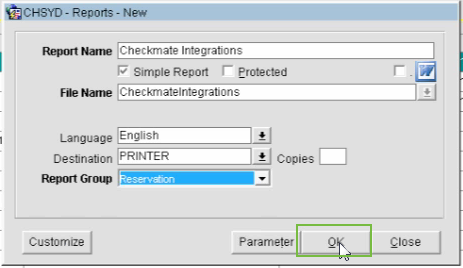
- You have now created the Integrations Opera Report that we will use to send Reservation Updates into TrustYou Messaging
Part 2: Schedule the Integrations Opera Report
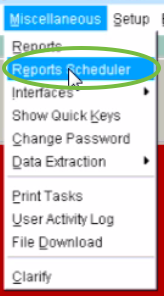
- Open Opera in the PMS module, go to Miscellaneous > Reports Scheduler
- In the Reports Scheduler, click New to create a new scheduling of the Integrations Opera Report configured in Part 1.

- Use the Search bar to search for the TrustYou Messaging Integrations report configured in Part 1
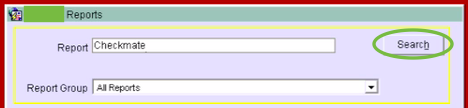
- Select the TrustYou Messaging Integrations report and update the following fields in the bottom of the window. Click OK.
- File Format: Delimited Data
- Delimiter: , (“comma”)
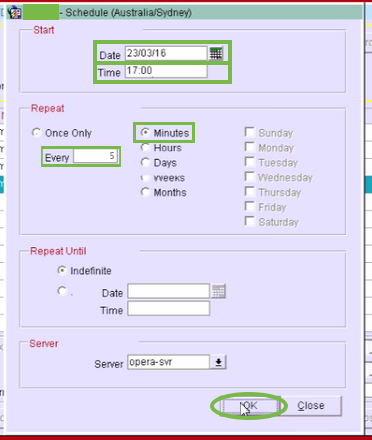
- In the next screen, Schedule, update the following fields. Click OK.
- Date: Enter the date that you would like to start sending your Outreach Message (recommendation: the following date)
- Time: Enter the time that you would like your Outreach Message to send on a daily basis. 12:00am or 00:00 are good options.
- Under the Repeat section, select the Minutes radio button and in the box next to Every enter “10”.
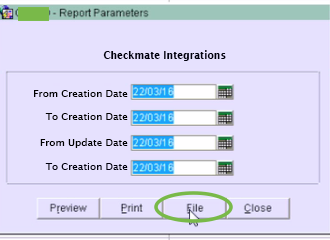
- On the Report Parameters screen, click File.
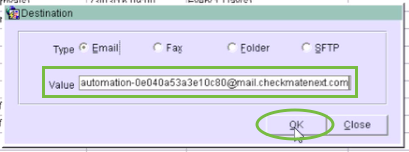
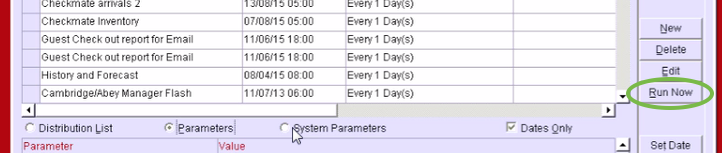
- You will be brought back to the main Reports Scheduler screen that will now include the Report Schedule that you just set up. Select the TrustYou Messaging Integrations schedule that you just set up, click the Distribution List radio button, then click New
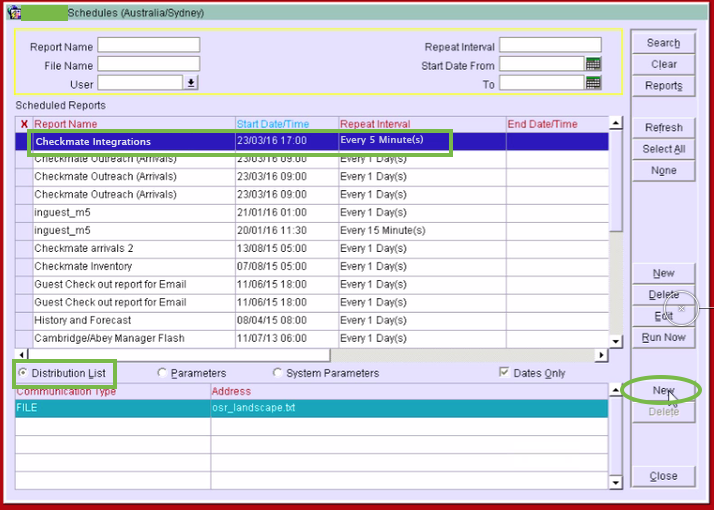
- Paste the Integration Email Address from the Recurring Email Import Integration that you started in the Value field then click OK
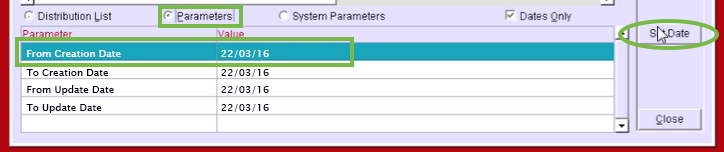
- Click the Parameters radio button. Select the line for From CreationDate then click SetDate
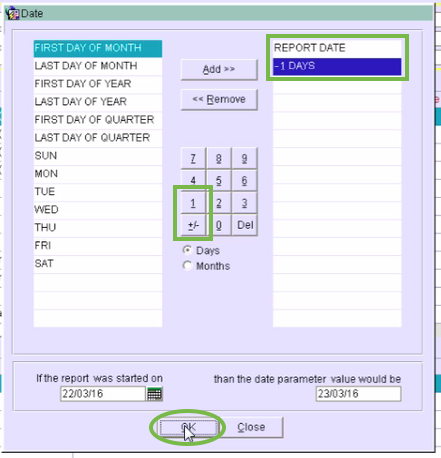
- Make sure Report Date is in the column on the right, click the 1 button then the +/- button twice to add “-1 Days” then click OK.
- Select the line for To Creation Date then click Set Date
- Make sure Report Date is in the column on the right then click OK. The value for To Creation Date should be REPORT DATE.
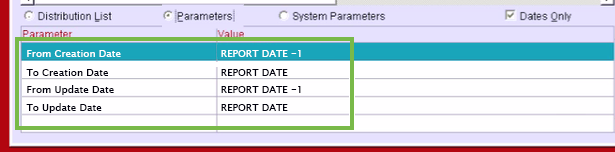
- Repeat steps 9-11 for “From Update Date” and “To Update Date” so that the “From Update Date”Value is “REPORT DATE -1” and “To Update Date”Value is “REPORT DATE”. Your parameters should look like the following when you’re done.
- Click Run Now to trigger an initial send of the file to move on to completing your Integration Setup.
StayNTouch Rover PMS Integration
TrustYou Messaging Integrations allow you to automatically feed customer information from your Customer Management System to TrustYou Messaging. For StayNTouch Rover PMS, a simple integration connector has been created to allow users to connect TrustYou Messaging and StayNTouch Rover easily.
To setup the StayNTouch Rover PMS Connector, use the following steps:
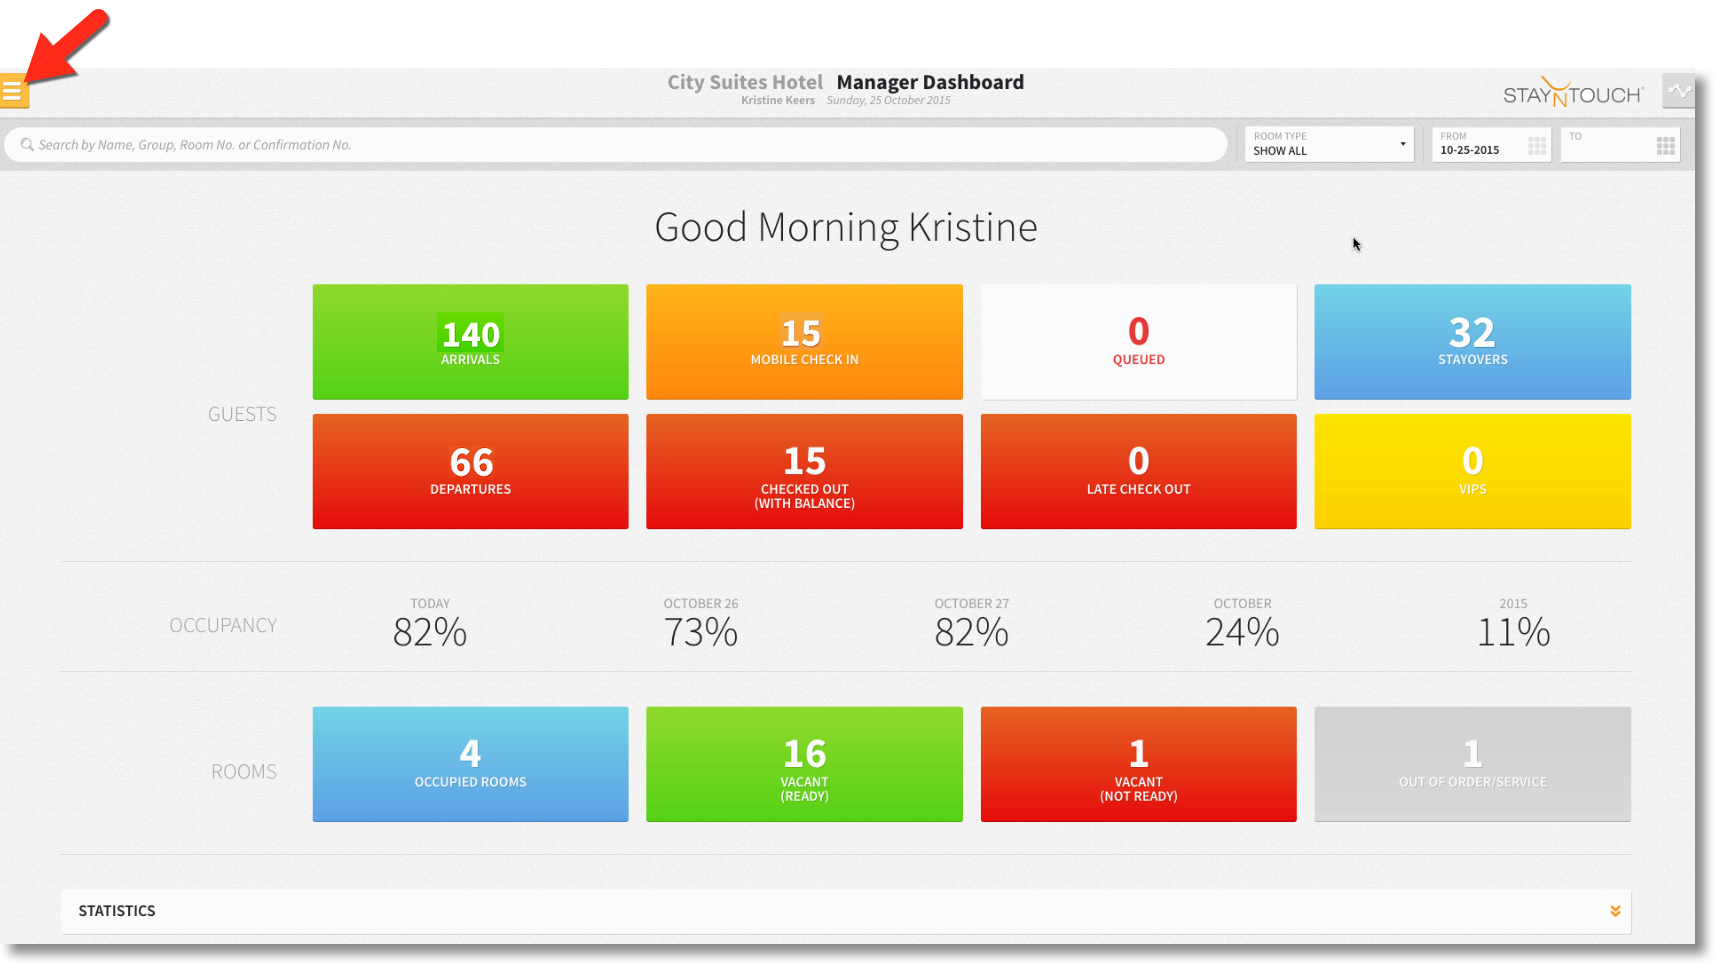
- Click the Sidebar Menu Icon after logging-in to Rover with your unique username and password. Select the Sidebar Menu Icon
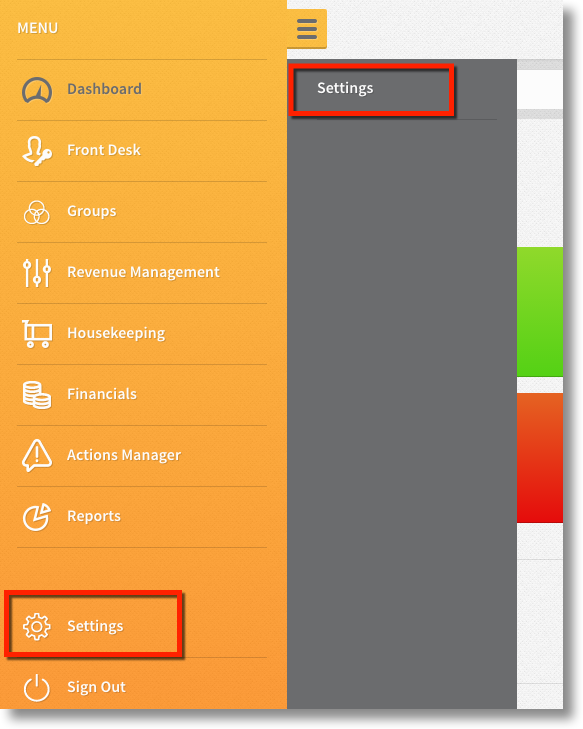
- Navigate to Rover Settings. Select Settings from the pop-out menu. Then click Settings again.
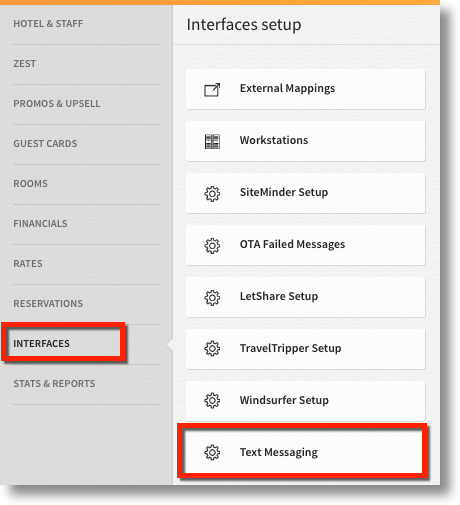
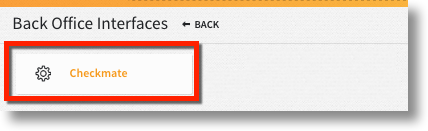
- Locate Text Messaging Interface. From the settings options, click Interfaces. Select Text Messaging. Lastly, click Checkmate.
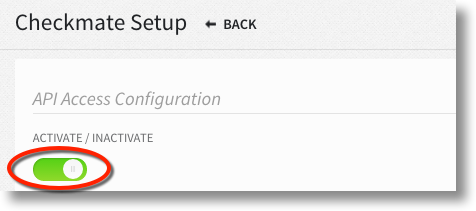
- Activate API Access Configuration. From the TrustYou Messaging Setup page in Rover, click the configuration toggle to turn this interface ON. The toggle is ON when it is right-facing and displays in green.
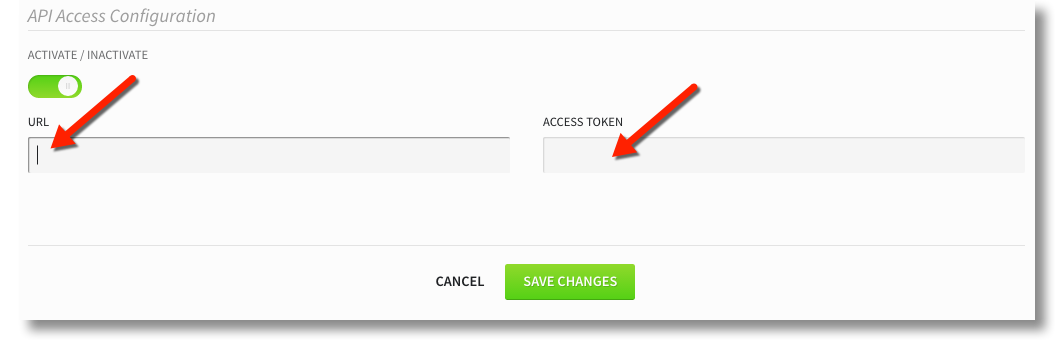
- URL and Access Token. When the toggle is set to ON, two blank fields will appear for the URL and Access Token. In Rover, enter the corresponding URL and Access Token in the fields provided.
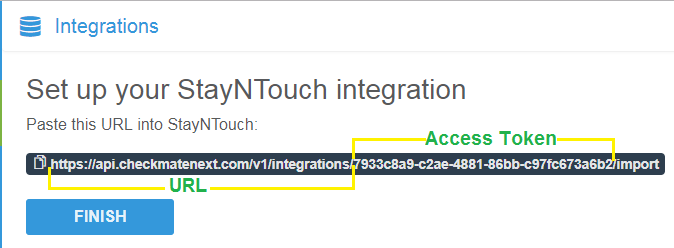
- Locating the URL and Access Token. The URL and Access Token will be provided to you by TrustYou Messaging. You can locate this information in TrustYou Messaging by selecting “Integrations”. TrustYou Messaging will provide a single URL that contains both the URL and the Access Token.
- The URL is the first component of the URL and follows a “https://…” format.
- The Access Token is the second part of the URL before “/import” and is a series of numbers, letters, and dashes.
- After entering the URL and Access Token in Rover, make sure to click Save Changes.
Success! Well done! You’ve successfully set up Rover PMS with TrustYou Messaging!
Frontdesk Anywhere PMS Integration
TrustYou Messaging Integrations allow you to automatically feed customer information from your Customer Management System to TrustYou Messaging. For Frontdesk Anywhere PMS, a simple integration connector has been created to allow users to connect TrustYou Messaging and Frontdesk Anywhere easily.
To setup the Frontdesk Anywhere PMS Connector, use the following steps:
- Click on “Integrations”

- Click on “+ New Integration”.
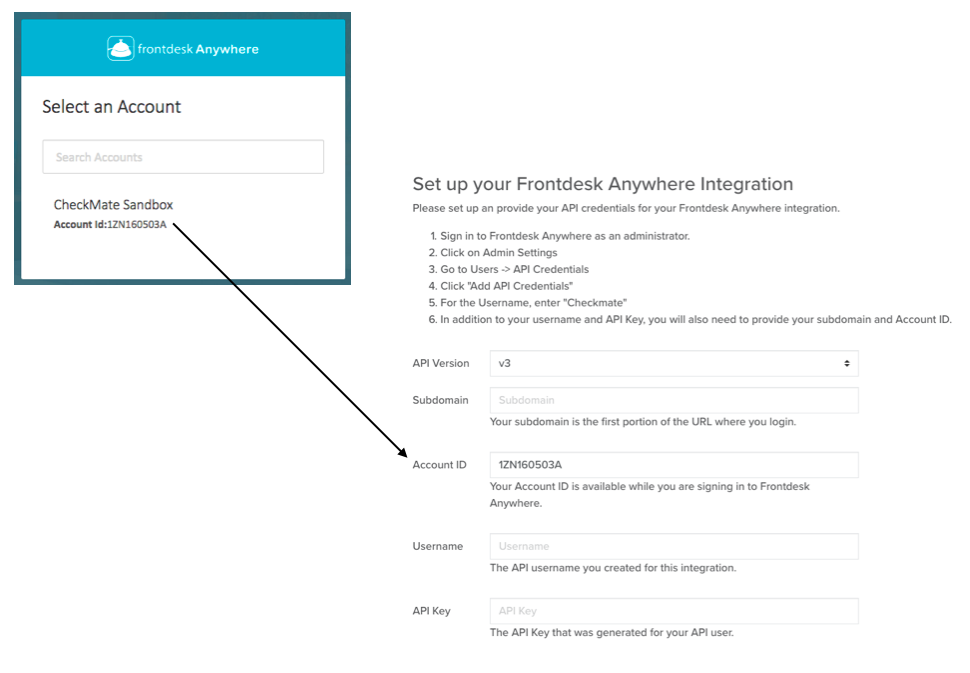
- Click the “Let’s get started” button in the box to Integration with Frontdesk Anywhere. You will be brought “Set up your Frontdesk Anywhere Integration” page. Please note that you will now need to sign in to Frontdesk Anywhere as an administrator for the next few step.
- Go to the sign in screen for Frontdesk Anywhere and log in as an administrator. Before you select the account to log into, copy the “Account ID” into the “Account ID” field in the TrustYou Messaging setup page. Note: The Account ID is your property Account ID for Frontdesk Anywhere.
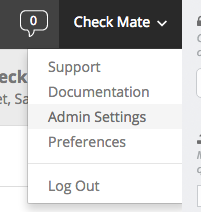
- Go to “Admin Settings” in the top right-hand corner in Frontdesk Anywhere.
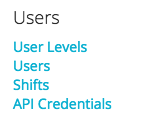
- Under Users, click on “API Credentials”.
- Click the “Add API Credentials” button.

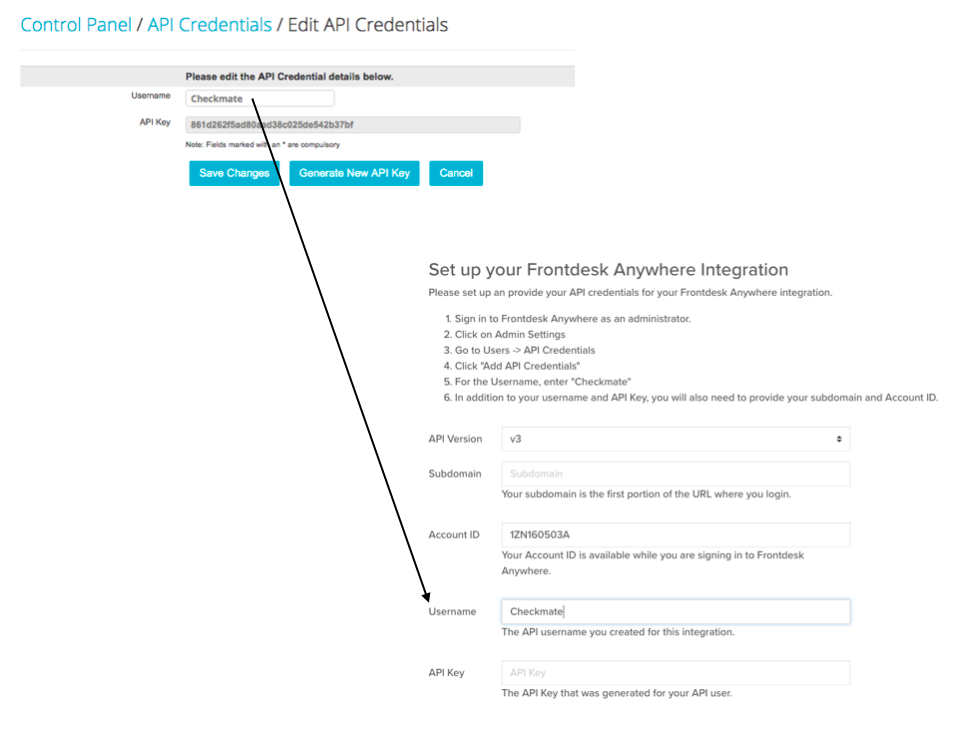
- Enter “TrustYou Messaging” in the Username in Frontdesk Anywhere and in the “Username” field in the TrustYou Messaging setup page.
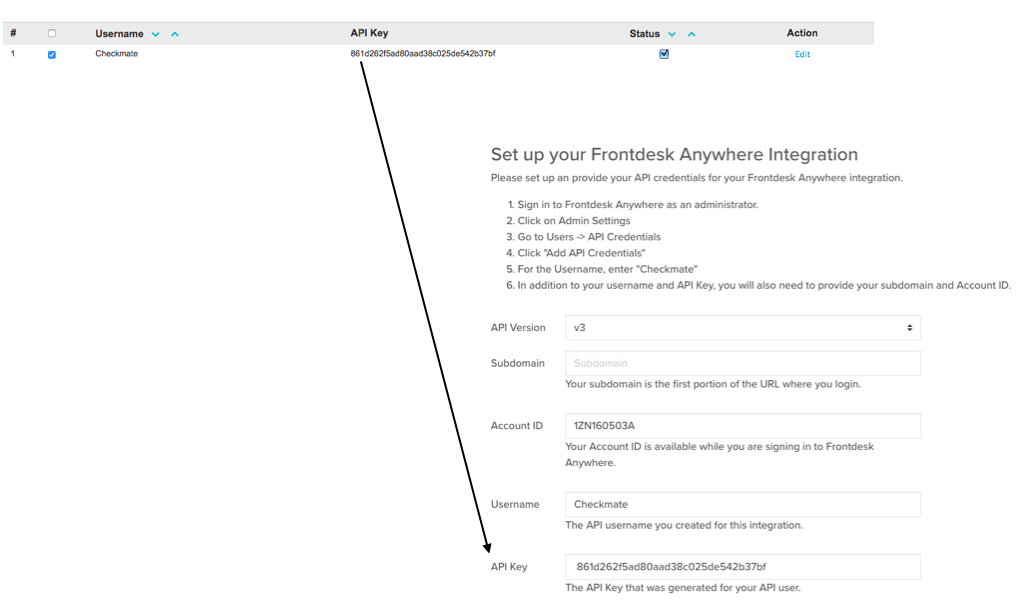
- Copy the “API Key” from Frontdesk Anywhere and paste it into the “API Key” field in the TrustYou Messaging setup page.
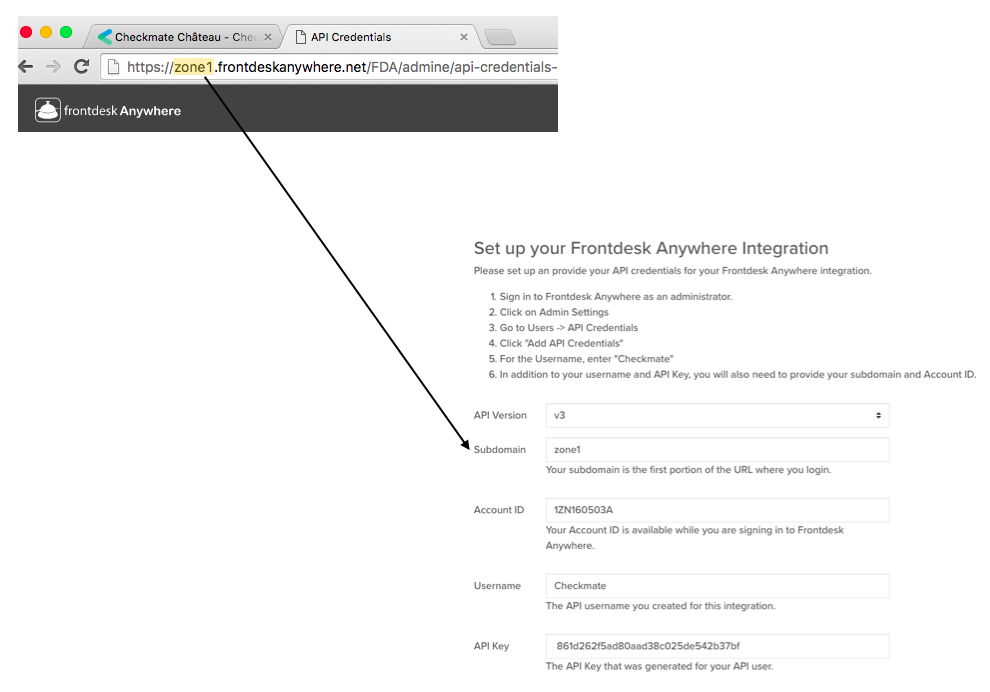
- Use the dropdown in the TrustYou Messaging setup page to select which version of Frontdesk Anywhere you use – either V2 or V3. Please reach out to your Frontdesk Anywhere support contact if you are unsure which version of Frontdesk Anywhere you are on. If you use V3, you will need to provide a value in the “Subdomain” field. To get this value, look at the URL you use for Frontdesk Anywhere. The “Subdomain” is the first portion of the URL. Copy and paste the first part of the URL into the Checkmate setup page.
- Now that you have entered all the required fields into the TrustYou Messaging setup page, click “Save”.

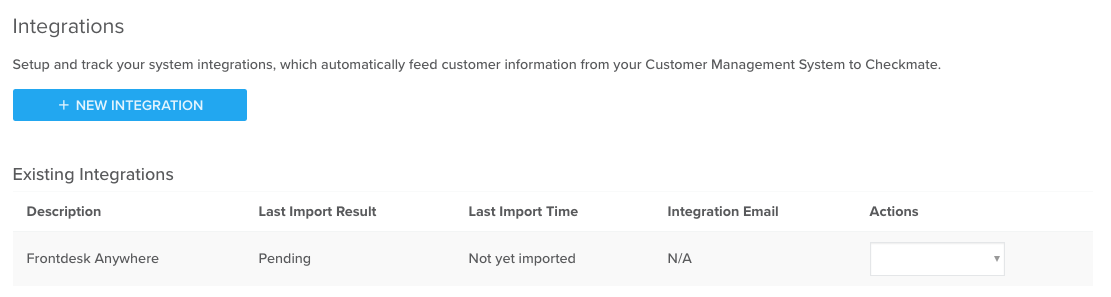
- Confirm that the connector has been successfully setup when the “Last Import Result” changes from Pending to Successful.
Congrats – you have now successfully set up your Frontdesk Anywhere PMS Connector!
Integrate TrustYou Messaging with your Google Listing
Guests have now the possibility to contact you directly via your Google Listing, if you would like to guide this traffic to TrustYou, find our Blog how you can do so: http://www.trustyou.com/blog/industry-news/google-listings-now-feature-messaging
Settings
Log into TrustYou Messaging
Logging into TrustYou Messaging is simple! First, go to https://login.trustyou.com.
Then, enter your Login Credentials.
- Admin: ONLY Email Address + Password
- Employee: Username + Password OR Email (if one provided in User Profile) + Password
Note: All employees will now have usernames and will be able to log in directly, rather than going through the Shared Computer Link.
Once you enter your credentials, you will be able to log into the TrustYou Messaging Dashboard.
Update your business name, phone, timezone and score scaling
Admin users have the ability to update their Name, Phone, Timezone and score scaling from within the Settings page. The Name is the name that is displayed to your Customers on email communications.
Click on the “Settings” icon in the bottom left-hand corner of the dashboard![]()
You will be automatically brought to the “Business Profile” tab of the “Settings” page. On this page, you’ll be able to view and edit your Business’s Name in the “Name” field, Phone in the “Phone” and “Country” field, Timezone in the “Timezone” field and Score Scaling in “Score Scaling” field. If the guest tries to call your texting number then this call will be routed to your business phone number which is added here.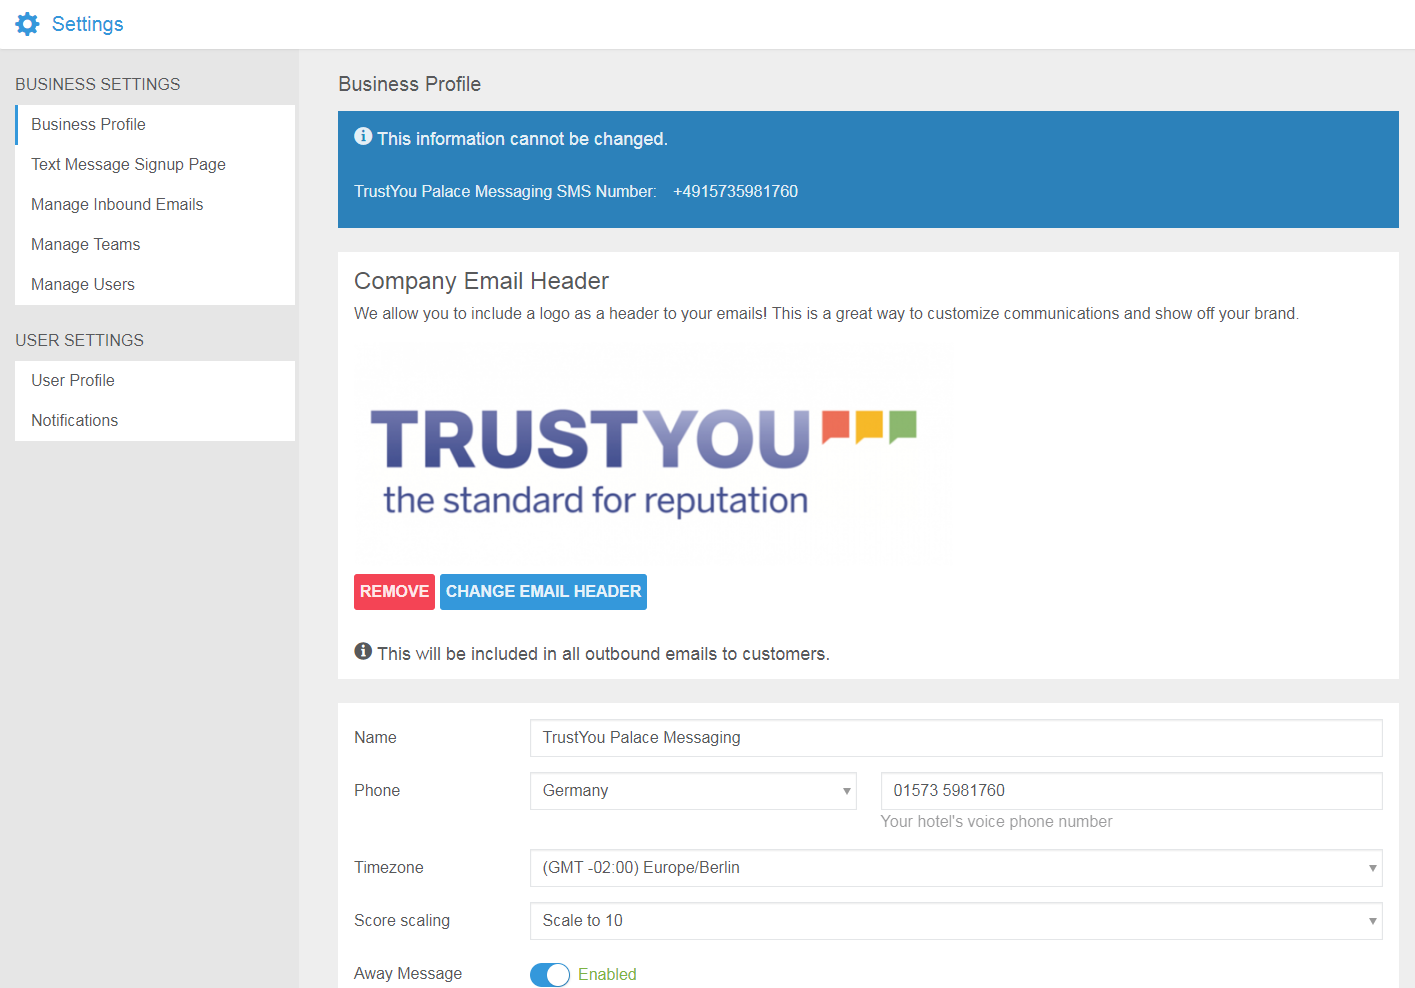
If you edit any of these fields, make sure to click “Save” to save your changes.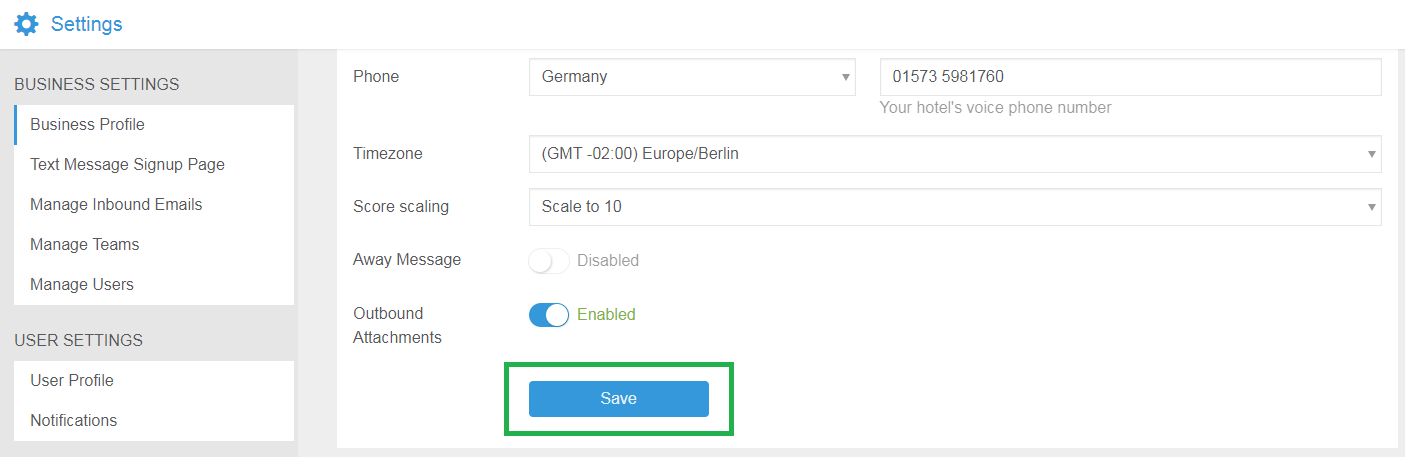
Set away message outside of business hour
Let your customers know when you’re available, and more importantly: when you’re not. You can do this by setting your business hours and an away message in TrustYou Messaging.
To start, head to the Settings section for your account (from the drop-down in the bottom left-hand corner of your account):![]()
In your Business Profile:
- Confirm correct Timezone
- Enable your Away Message
- Set the hours that you’re away (or when your business is closed)
- Customize your away message (Tip: If applicable, provide back up business “Emergency” contact information or protocol.)
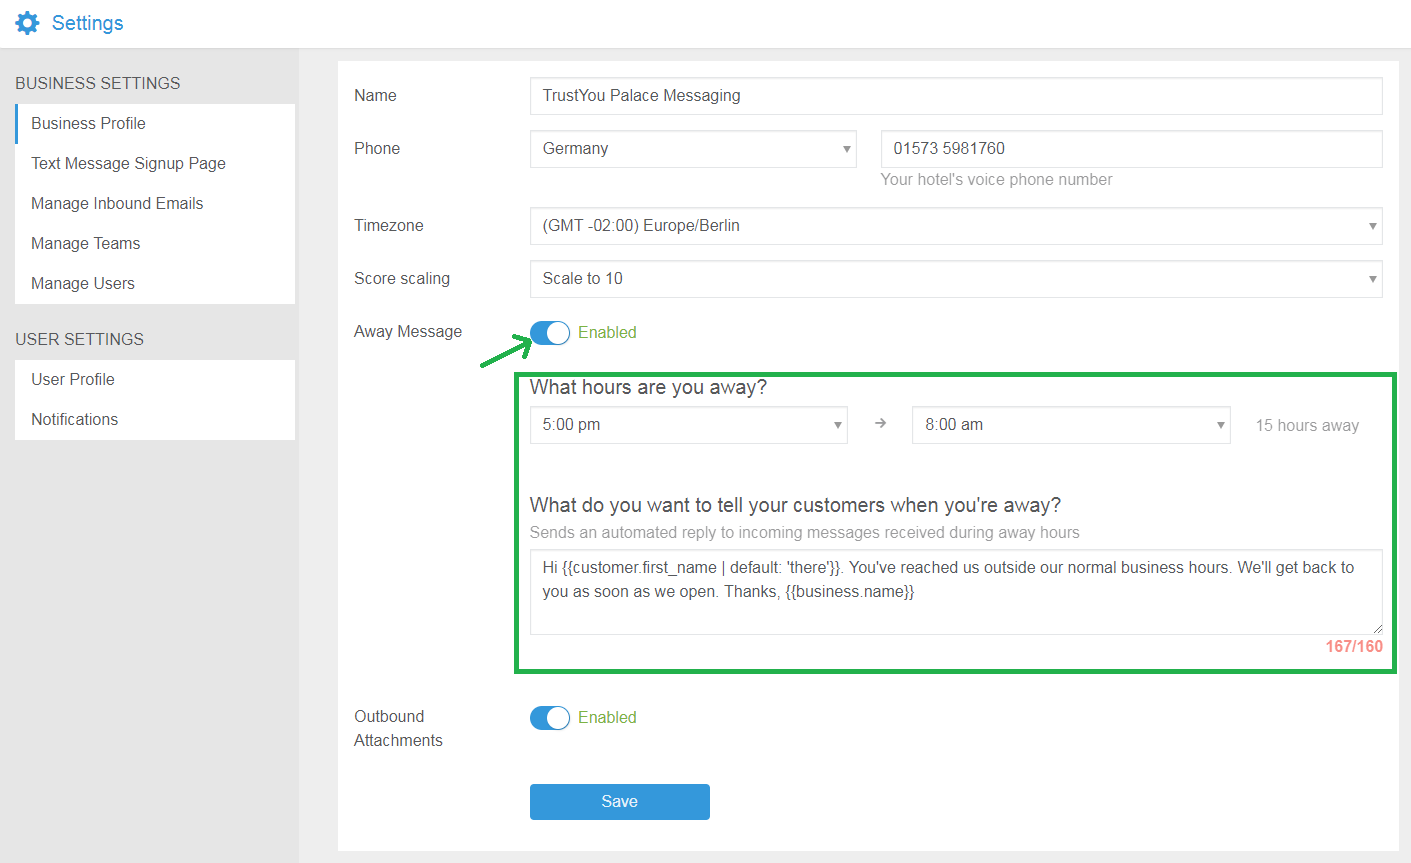
Make sure to click “Save” after enabling your Away Message or making any changes to the message.
Now, you’re all set! Any customers that reach out to you during these “Away” hours will automatically receive your away message.
Disable attachments with outbound messages
If you do not want your hotel staff to attach files with the messages sent to the customers, then switch “Outbound Attachments” button under “Business Profile” to “Disabled” status and save it. To enable it again, just switch the button to “Enabled” status and save.
In regards to messages being sent out, outbound attachments are enabled by default but can be disabled by clicking on the Outbound Attachment switch.
Phone number for text messaging
Your text messaging phone number is displayed within the “Business Profile” section of your account. Note that only users designated as an Admin can view the business profile section.
First, navigate click on the “Settings” icon in the bottom left-hand corner of the dashboard.![]()
You will be automatically brought to the “Business Profile” section of the “Settings”. Here, you can find your TrustYou Messaging texting messaging number in the “SMS Number” field in the blue box.

Uses of your texting number
If a customer calls the texting number that you set up through TrustYou Messaging, that call will re-route to the main business phone number you used when setting up your account. We suggest that you provide your new ‘text-to’ number as the main form of communication for your customers. This will help consolidate business contact information making it easier for your customer to talk to you in whichever form they prefer (text or email).
Your new ‘text-to’ number can be found in the “Business Profile” tab of your “Settings” page in the “SMS Number” field in blue:
To see or change the text phone number you provided us, please reach out to our Client Success Team (service@trustyou.com).
Configure Text Message Signup Pages
Text message signup pages help make it easy to start conversations with your customers. When a customer enters their mobile number and name on your signup page, they will receive a custom welcome message from your business. They can reply to this message at any time to reach your team.
Here are some ways you can use your signup page:
- Link to your signup page in email messages
- Provide a link to your signup page on your website
- Display your signup up on a tablet computer in your lobby or reception area
To configure your page:
- Select Settings in the bottom-left corner of the dashboard.
- Select “Text Message Signup Page”.

Customize and preview your page
- Preview/Page Link: use this link to review what this will look like for your customers and embed/display the signup page where it works best for your business!
- Signup Page Text: use this section to tell your customers why they should provide their phone number.
- Text Message Signup Confirmation: your customers will receive a text message with the text you enter in this section.
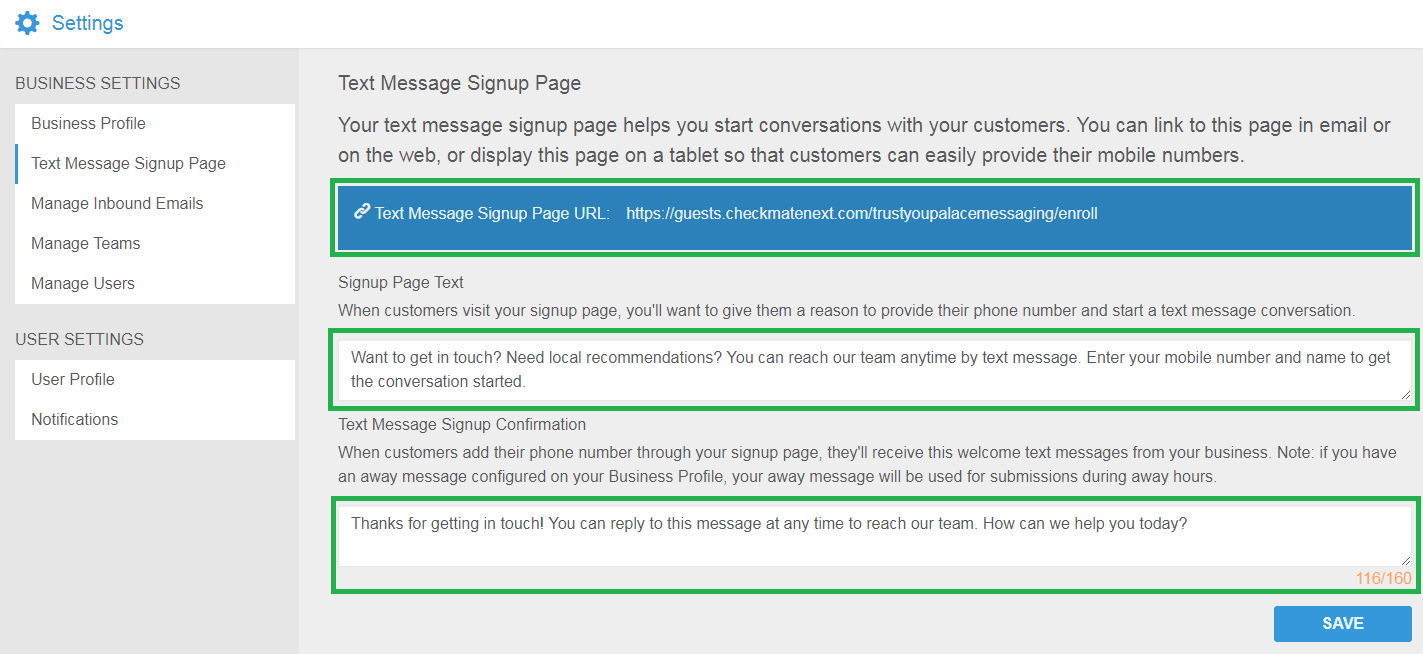
Once you’ve made any updates to the “Signup Page Text” or “Signup Confirmation”, make sure to click “Save” to save your changes.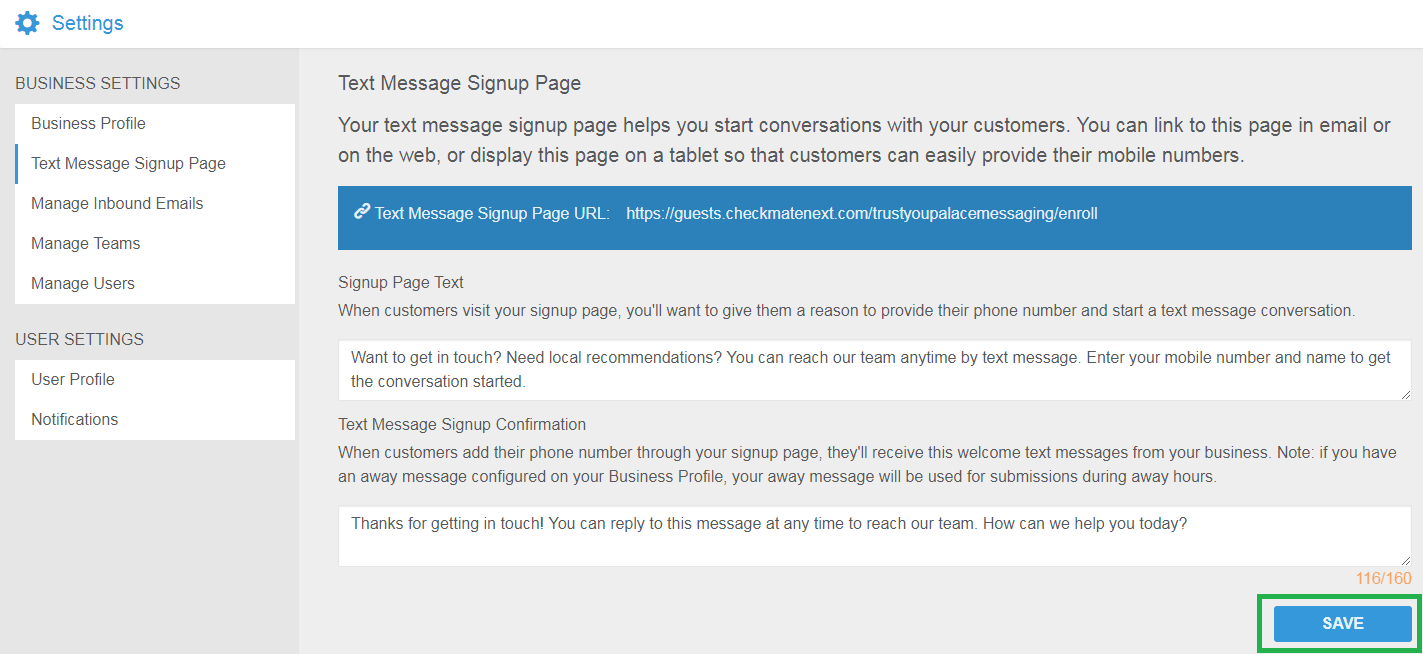
Configure an email address to forward to TrustYou Messaging
You can forward your existing business email addresses into your TrustYou Messaging account. This will allow you to manage and respond to customer email messages from within your TrustYou Messaging account.
You can configure an unlimited number of email addresses to forward into your TrustYou Messaging account. To set up a new forwarding email address, navigate to Settings > Manage Inbound Emails.
Here you’ll find links to email forwarding instructions for major email providers.
- Microsoft Exchange: automatically redirect incoming messages to another e-email account
- Google Apps & Gmail: automatically forward incoming emails to another account
- GoDaddy: setting up forwarding accounts in the workspace control center
- Yahoo Small Business: automatically forward email with Yahoo Mail
- Zoho Mail: enable email forwarding
Manage teams
Customer requests can often require collaboration across multiple teams at your business. By setting up different teams in your TrustYou Messaging account, you will be able to efficiently route requests to the appropriate team, internally collaborate across teams, and seamlessly respond to customers.
To create a team, follow the steps below:
1) Go to Settings in the bottom left corner of the dashboard.![]()
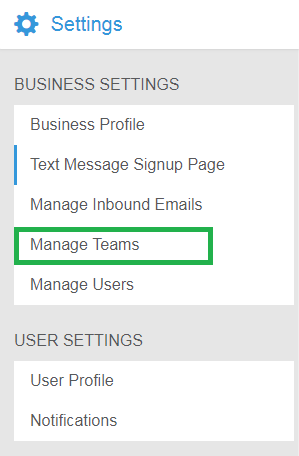
2) Under Settings, click on “Manage Teams” (e.g., Guest Services, Reservations, Room Service)
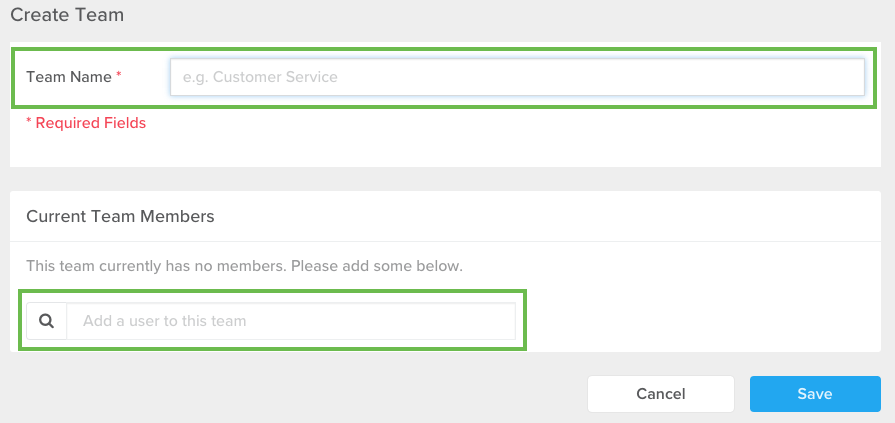
3) Name your team and add relevant users to the team
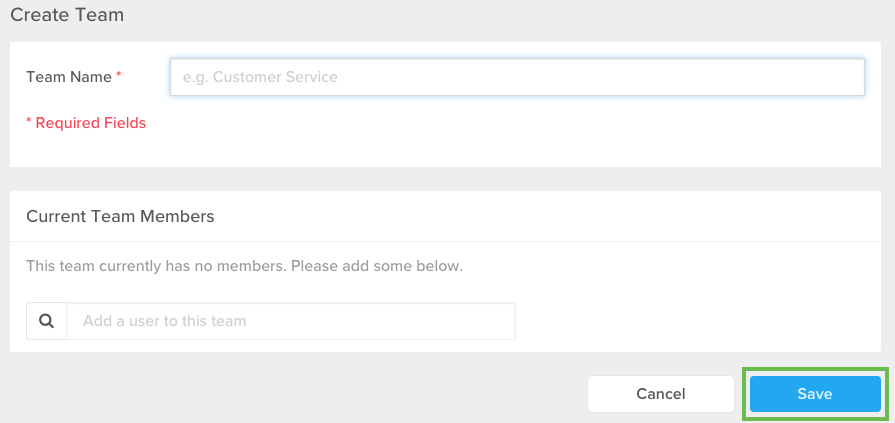
4) Click Save
Manage users & add team members
TrustYou Messaging works best when you create accounts for your entire team. You can add an unlimited number of users to your account with no additional fees.
To add a user, navigate to your Settings page (note that only Admins can create additional users) and select Manage Users to Add New User. 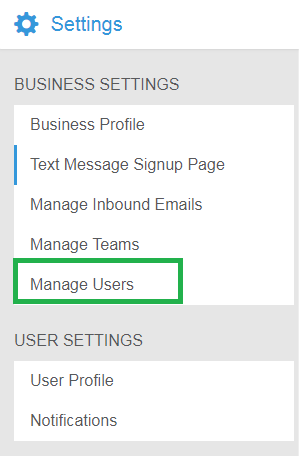
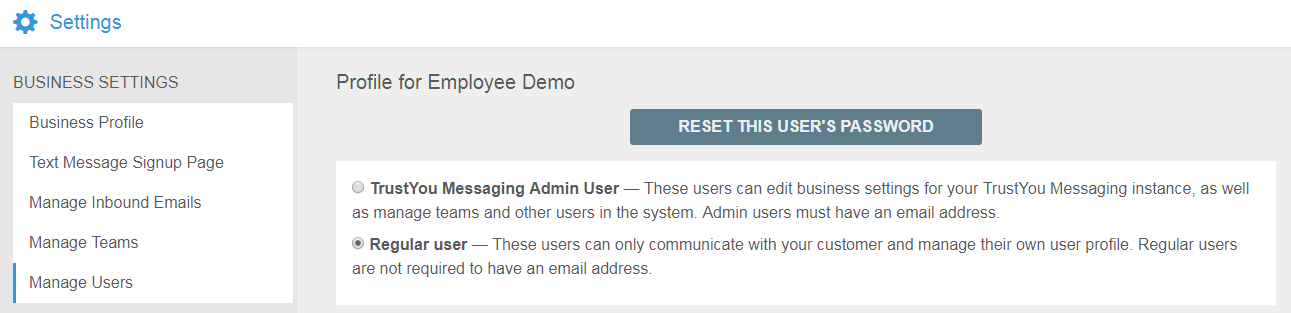
User Level: There are two different user-levels that you can designate for any given user.
- Admin User (Managers, Owners, etc.) – these users can edit and change settings for your account, create outreaches and create new integrations. An email address is required for Admin users.
- Regular User(Employees) -these users can view and respond to messages, but can’t change business settings. Regular users are not required to have an email address.
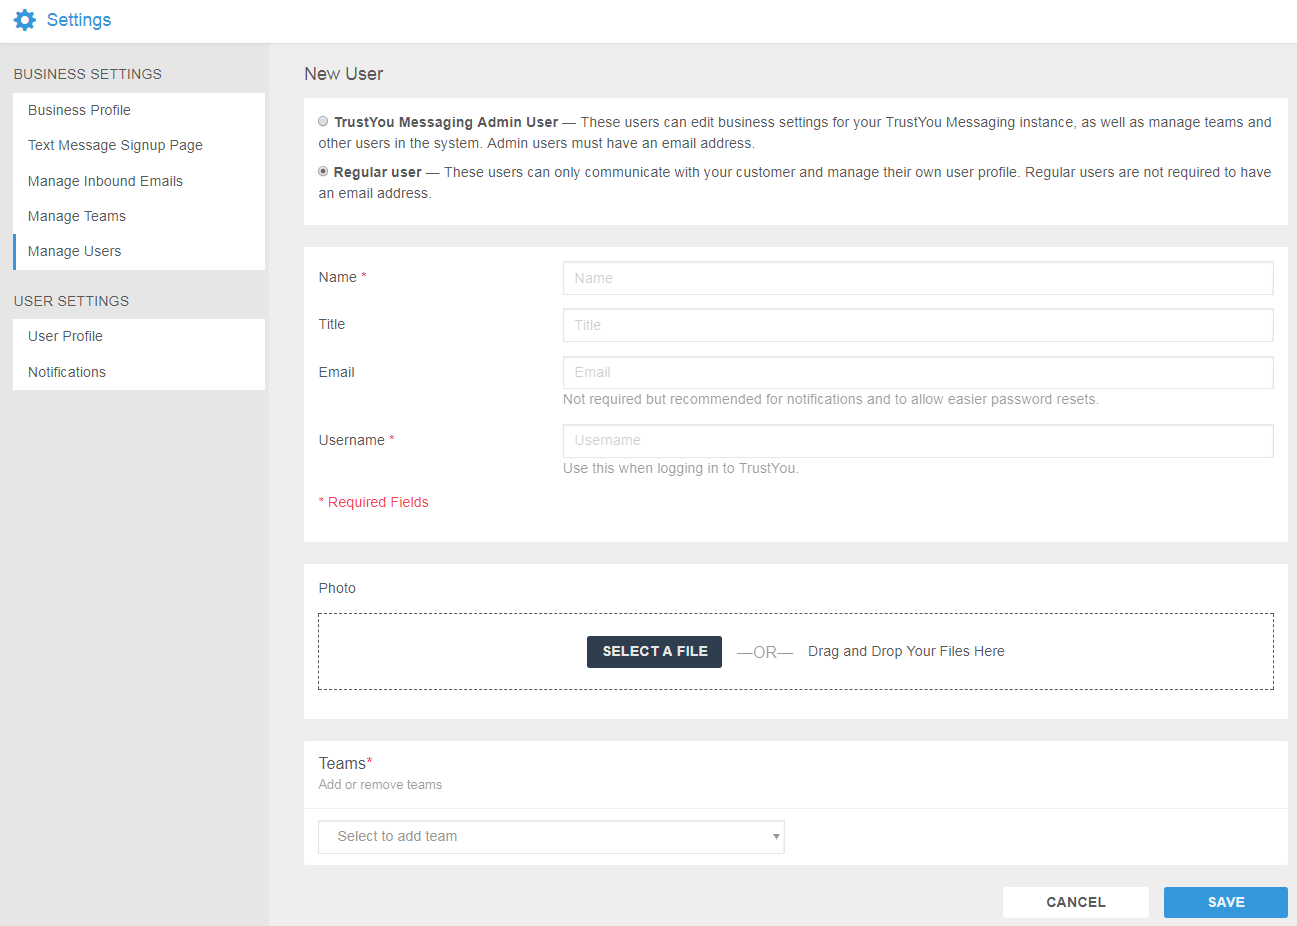
Add to Team(s): Once you’ve entered the user details, you’ll want to assign the user to the appropriate team(s) and Save.

Passwords
Admin users will receive a welcome email with a sign-in link. They will have the opportunity to create a password the first time they sign-in. Each time they sign in they will use their Email Address + Password.
Regular users will have a username once their account is created. The first time they sign into their account, they will set up a password. Each time they sign in they will use either Username + Password or email+password if email ID was provided for the user.
Remove a user
To remove a user, click on the “Settings” icon in the bottom left-hand corner of the dashboard![]()
Once in “Business Settings”, click on “Manage Users”.
Within the “Manage Users” page, you will see all of your Business’s Users.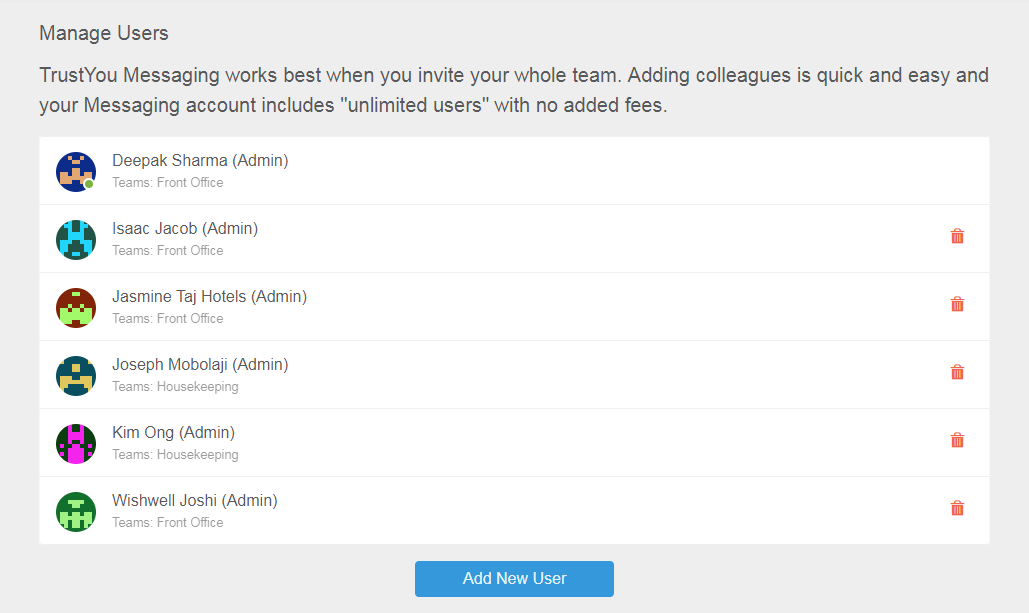
Click on the Trash icon to the right of the specific user you would like to remove.
You will be prompted to confirm that you would like to remove the user. To confirm, click “Remove”.

The user is now removed from the system and will no longer be displayed on your “Manage Users” page.
Update user information and team assignment
An individual user can log into their own account to update their own User Information. Additionally, as an admin user, you can update a User’s Information and Team Assignment.
To do so, click on the “Settings” icon in the bottom left-hand corner![]()
Once in “Settings”, click on “Manage Users”.
Within the “Manage Users” page, you will see all of your Business’ users. Click on the specific user that you would like to change the User Information or Team Assignment for.
Now in the User’s Profile, you can update the type of user (Admin User or Regular User), Name, Title and Photo.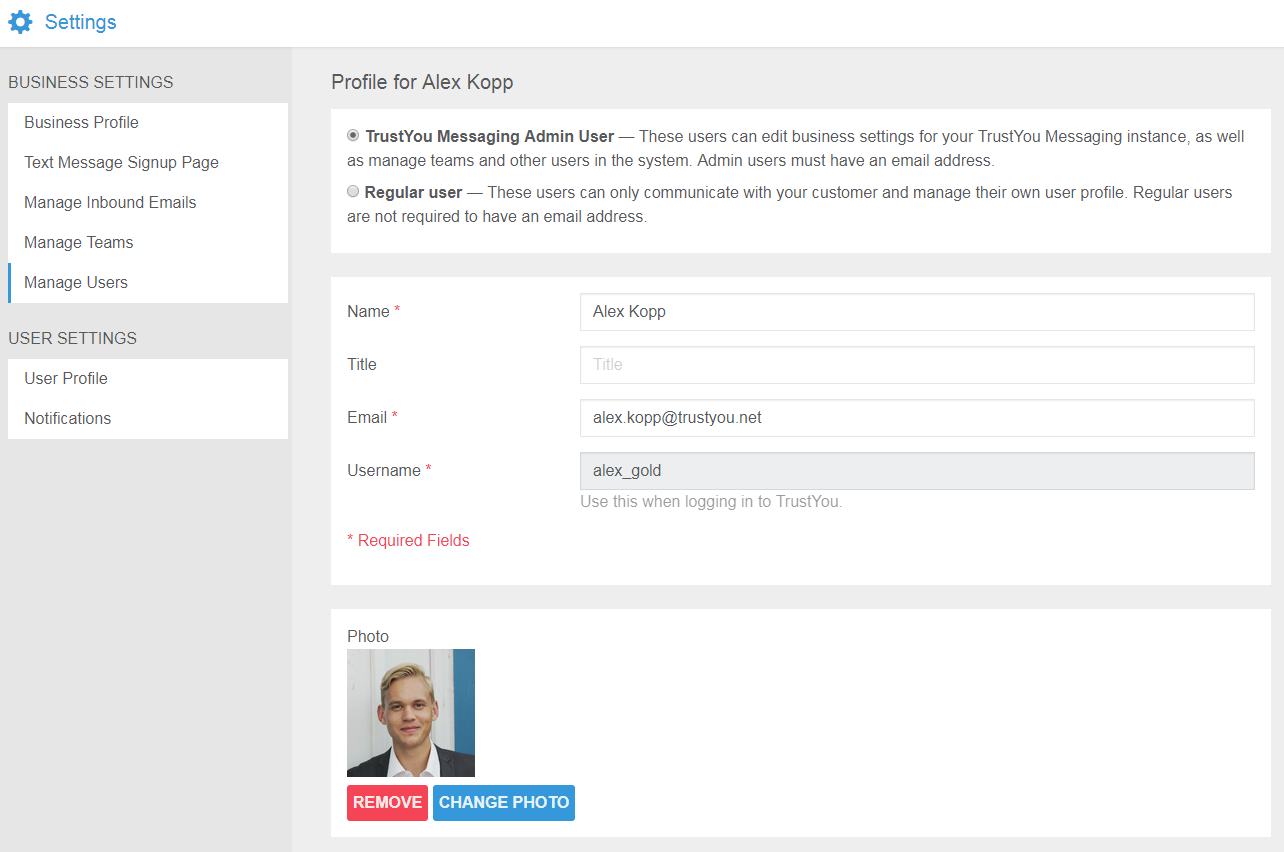
Additionally, you can update their Team Assignment by removing them from a Team or adding them to a new Team.

Once all updates are complete, make sure to click Save on the bottom right-hand corner.
Set up users without an email address
Regular Level Users don’t require an email address to setup an account. (Only Admin-Level Users require an email address for setup.) This is wonderful because it allows your team members to effortlessly switch between users using only a 4-digit pin versus logging in and out each time shifts change.
To add a user, navigate to your Settings page (note that only Admins can create additional users) and select Manage Users and click on Add New User.
Set the new user to a Regular User. Enter the Name, Title, Photo and assign to the appropriate team(s).
Upon first sign-in on an Authorized Computer (or through the Shared Workstation URL)*, Regular Users will be prompted to create a 4-digit pin the first time they sign in, which is what they will use to sign in for any subsequent sessions.
Reset regular user’s 4-digit pin
Please note that PIN can be reset only for those users whose email address is not added. It’s super simple to reset a Regular User’s 4-digit pin.
Navigate to your TrustYou Messaging Settings section and select Manage Users from your Business Settings.
Select the user who needs a pin-reset, and click the handy RESET THIS USER’S PIN button
The next time this user needs to login, he or she will be prompted to set up their new 4-digit pin number.
Manage Widgets
With the web chat widget feature, Admin users can generate a widget from TrustYou Messaging and can integrate with the hotel website, wi-fi page or any other webpage. Guests will be able to chat using this widget and their messages will be received in the Messaging Inbox. Ensure, that the widget is enabled on your account. You can then integrate the shown code in the <body> of your desired location.
Update your default team
Once you’ve created your Business’ teams, one of the teams will be assigned to the “Default Team”. This means that any new messages will default to this Team.
To view or update your Default Team, click on the “Settings” icon in the bottom left-hand corner of the dashboard.![]()
Once in “Settings”, click on “Manage Teams”.
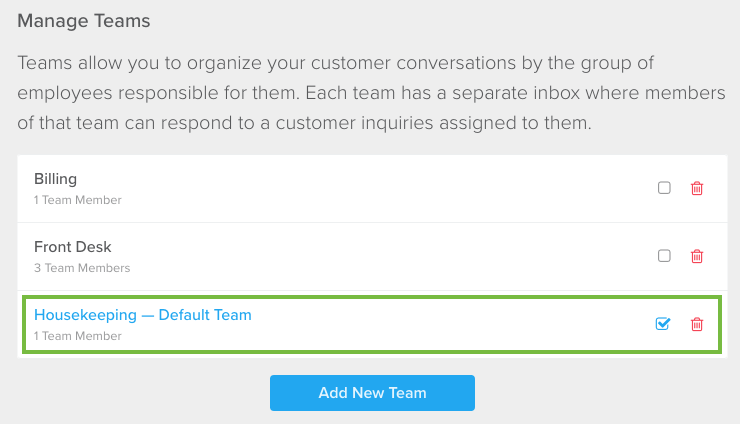
Within the “Manage Teams” page, you will see all of your Business’ teams and the team highlighted in Blue and with the check-mark selected is your Default Team.
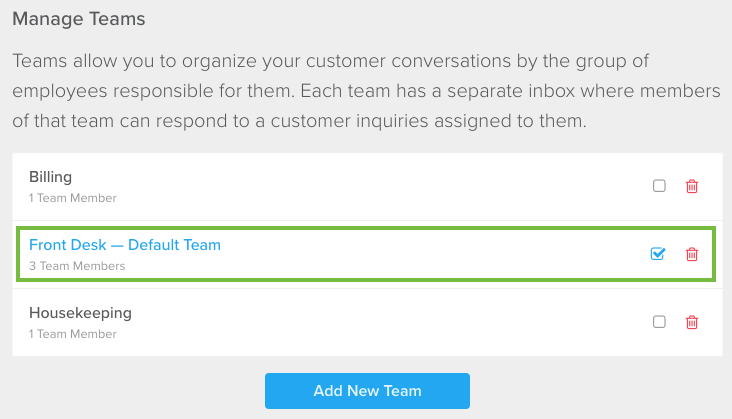
To change the default Team, click on the check-mark box of the Team that you would like to be the new Default Team.

Once checked, the Team selected with automatically become the new Default Team.
Manage your message notification settings
There are a couple of ways that we’ll let you know a customer has reached out to you even if you don’t have TrustYou Messaging front and center. Don’t you worry about missing a thing! This article will go through the Notifications options and how to adjust them for each user.
Please note that admin users can access the notification settings in two ways – from Profile icon (user name and picture) in the top-right corner and from “Settings” icon in the bottom-left corner. However, regular users can access it only from Profile icon as they don’t have access to “Settings” icon.
Access it from Profile icon
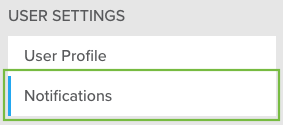
First, click on your profile icon in the top-right corner of the dashboard and click on “User name” from the drop-down menu.![]()
Next, under “User Settings”, click on “Notifications”.
Now, from the Manage Notification Settings page, you are able to review, enable or disable your specific notification settings.
There are two types of Notifications here:
- Desktop Notifications: These appear at the top right corner of your screen and are less obtrusive. By clicking Enable Sounds you can have a sound played for all desktop alerts. (We call this an Audio Notification). There are four actions that you can enable both Desktop Notifications and/or Email Notifications for:
- Only my mentions – whenever your name is mentioned in a conversation.
- Mentions & messages to my team(s) – whenever you or your team is mentioned in the conversation or the conversation is assigned to your team.
- All activity on all teams – for all the activities
- Nothing (desktop notifications disabled) – if you don’t want to receive any desktop notification.
- Email Notifications: These are conversation updates that are sent to your email address if you have one set up with your account. Emails are sent only during your business hours. There are three different type of notifications here:
- If mentioned, we will notify you by email immediately – There is no option to disable this setting.
- For inbound messages to my team(s) – You can choose if you want to receive an email notification when there are inbound messages to your team(s). You can choose if you want to receive an email immediately or not and you can also choose an option of sending you an escalation email if the first email is unresponded.
- For inbound messages to other team(s) – If you want to receive emails for mentions of other teams then you can configure this option. Options under it are similar to inbound messages to my team.
Here is what the Manage Notifications Settings page looks like. Don’t forget to click “Save” when updating any of your settings!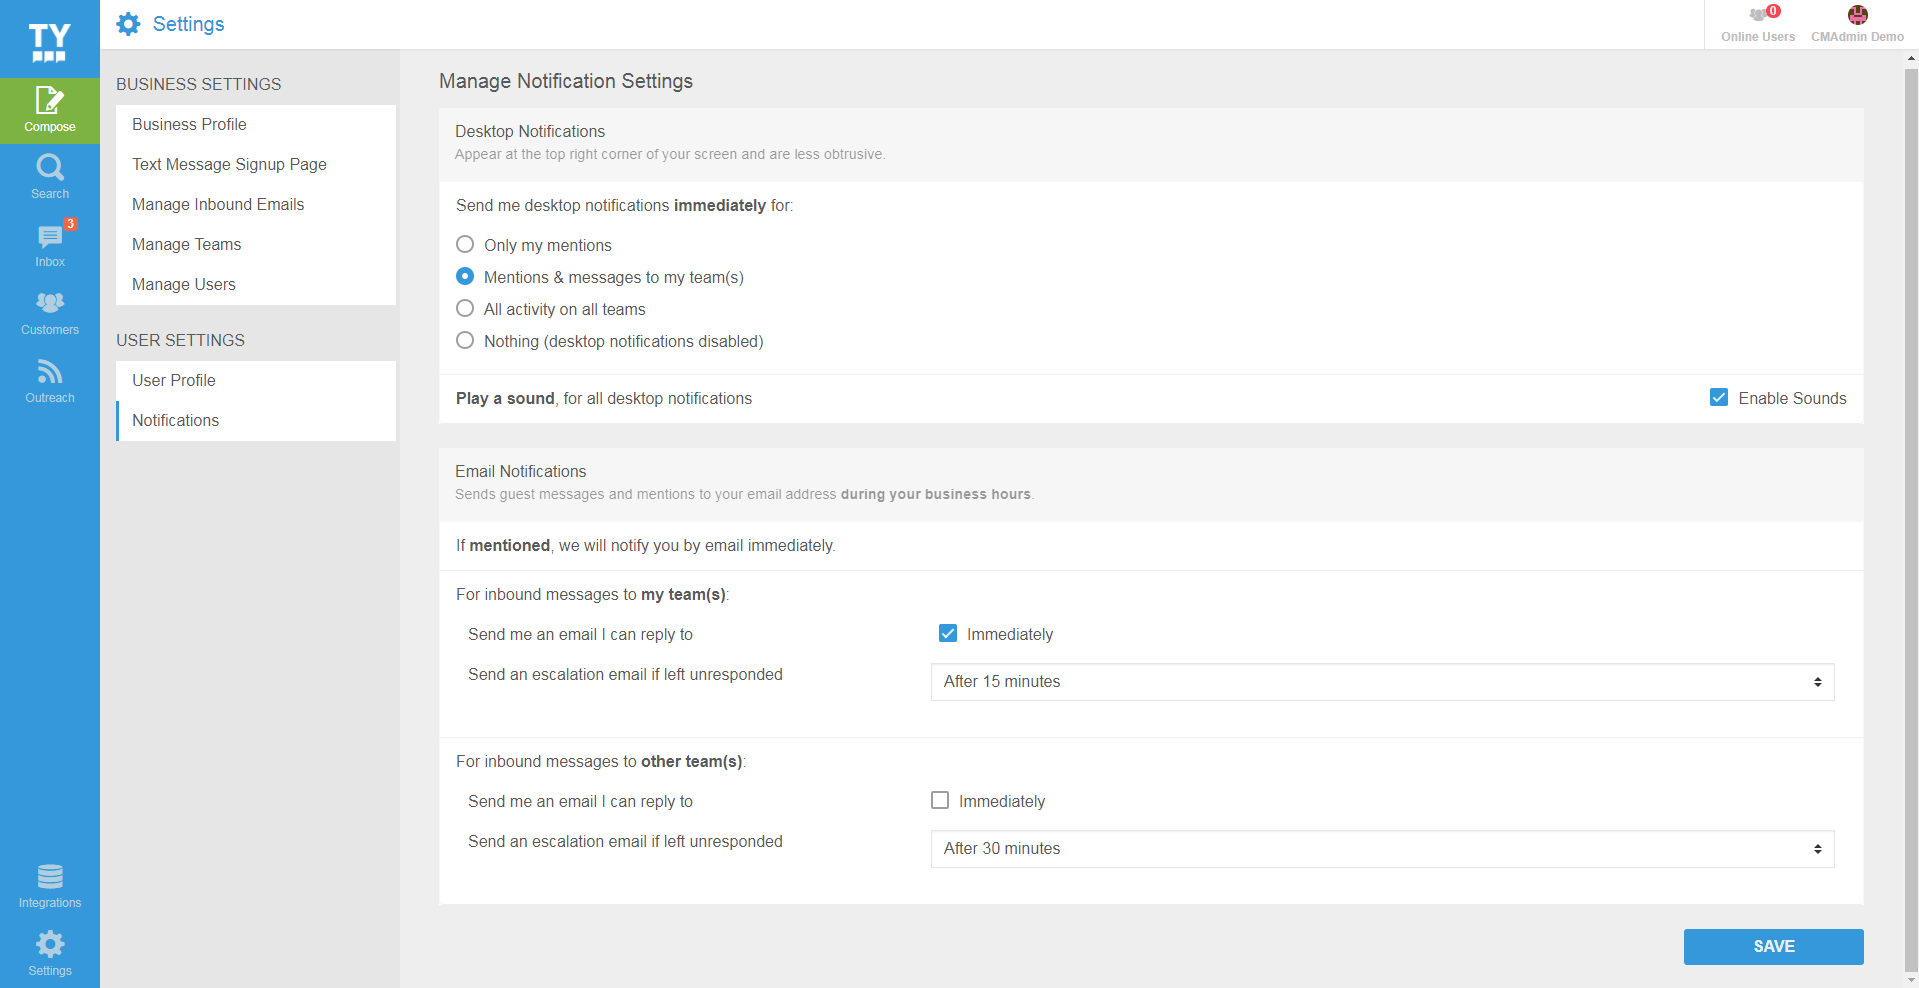
Access it from Settings icon
Admin users can click on Settings icon in left-bottom corner to access the same user settings as defined above.