How to generate an SSH key pair
For Windows machines
1. Using your browser, please navigate to this URL: http://www.chiark.greenend.org.uk/~sgtatham/putty/latest.html 2. Navigate to the part of the page where there is a category called “Alternative binary files”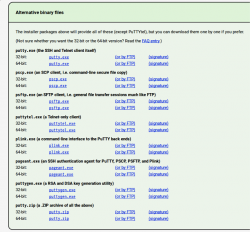 3. Please download “puttygen.exe”. You can do so by clicking the blue link with your mouse with the left click button. Or if you wish, you could right click with your mouse, select “Save Link As” and using your left mouse button, click on it. Remember where you have saved this .exe file as it will come in handy for the next step.
Note: If you are unsure if you are a 32-bit or a 64-bit architecture, please ask your IT department or someone who is proficient with the computer to figure that out for you. For the adventurous and daring individuals, you can easily find out which architecture you are using by simply using search engines such Bing, duckduckgo, yahoo or Google and entering search phrases such as:
“Finding out Windows 32 or 64 bit”
“Determining 32 bit or 64 bit Windows”
4. Next, go to the location where you saved your puttygen.exe and double-click it to open it. You will be greeted with something that looks similar to this:
3. Please download “puttygen.exe”. You can do so by clicking the blue link with your mouse with the left click button. Or if you wish, you could right click with your mouse, select “Save Link As” and using your left mouse button, click on it. Remember where you have saved this .exe file as it will come in handy for the next step.
Note: If you are unsure if you are a 32-bit or a 64-bit architecture, please ask your IT department or someone who is proficient with the computer to figure that out for you. For the adventurous and daring individuals, you can easily find out which architecture you are using by simply using search engines such Bing, duckduckgo, yahoo or Google and entering search phrases such as:
“Finding out Windows 32 or 64 bit”
“Determining 32 bit or 64 bit Windows”
4. Next, go to the location where you saved your puttygen.exe and double-click it to open it. You will be greeted with something that looks similar to this:
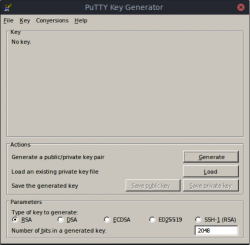 5. From here, please hover your mouse cursor over the “Generate” button and then click the button. The correct mouse button to use to click is the left one.
6. After that, you will see a screen similar to:
5. From here, please hover your mouse cursor over the “Generate” button and then click the button. The correct mouse button to use to click is the left one.
6. After that, you will see a screen similar to:
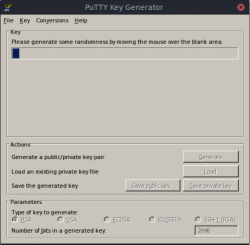 Follow the instructions of the PuTTY Key Generator and move your mouse over the blank area. You can use the hand you are most comfortable with and move the mouse. Feel free to move it left and right and back again. If you are feeling creative you can draw circles. It is okay if your mouse cursor comes out of the blank area and onto the desktop.
7. After sufficient movement, press the “Save public key” with your mouse.
Follow the instructions of the PuTTY Key Generator and move your mouse over the blank area. You can use the hand you are most comfortable with and move the mouse. Feel free to move it left and right and back again. If you are feeling creative you can draw circles. It is okay if your mouse cursor comes out of the blank area and onto the desktop.
7. After sufficient movement, press the “Save public key” with your mouse.
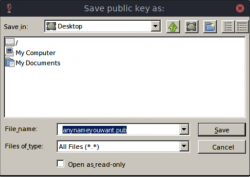 You will see a screen similar to the one above. It is up to you where you want to save it, but be sure that you remember where you saved it and that you could retrieve it later on when you need to. If it is too hard, please ask someone who has saved files before to help you.
Next is to think of a name for your public key file. You can name it anything you like, but preferably something easy to remember.
After that, please press “Save” with your mouse. Do not press “Cancel”. Be sure to use the left click when clicking the “Save” button.
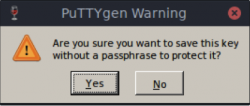
8. After saving the public key, it is time to save the private key. It is very similar to saving the public key, but as it can get complicated and I would like to eliminate uncertainty and surprises, I will continue the guide.
Due to the fact that we did not create a passphrase earlier, we can skip this and press “Yes”. Please be sure to press “Yes” and not “No” with your left mouse button.
You will see a screen similar to the one above. It is up to you where you want to save it, but be sure that you remember where you saved it and that you could retrieve it later on when you need to. If it is too hard, please ask someone who has saved files before to help you.
Next is to think of a name for your public key file. You can name it anything you like, but preferably something easy to remember.
After that, please press “Save” with your mouse. Do not press “Cancel”. Be sure to use the left click when clicking the “Save” button.
8. After saving the public key, it is time to save the private key. It is very similar to saving the public key, but as it can get complicated and I would like to eliminate uncertainty and surprises, I will continue the guide.
Due to the fact that we did not create a passphrase earlier, we can skip this and press “Yes”. Please be sure to press “Yes” and not “No” with your left mouse button.
 9. Once you have pressed the correct button you will be greeted with a screen like this:
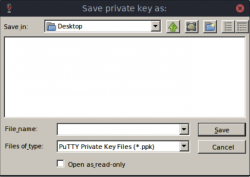 Again, you can create any file name you like. The same for location as well but be sure to remember where you saved the private key.
If it isn’t clear by now what the next step is, please continue onto step 10.
10. With the mouse, please select the “Save” button, not the “Cancel” button. Click it once with the left click and you are done.
Again, you can create any file name you like. The same for location as well but be sure to remember where you saved the private key.
If it isn’t clear by now what the next step is, please continue onto step 10.
10. With the mouse, please select the “Save” button, not the “Cancel” button. Click it once with the left click and you are done.
Linux Users
Enter this into the terminal: ssh-keygen -t rsa